Staging Setup Guide For Client Hosting
This guide provides a step-by-step instructions for setting up a website using client's hosting. It covers essential tools, installation processes and configuration settings to help you create, test and develop your website efficiently before deploying it online.
Login to Account Manager
Sign-in to Account Manager by accessing CRMS through PEGA under Account Summary Tab.

Once redirected to CRMS, log-in using your credentials. It will redirect you to client's CRMS Dashboard.
On the dashboard, click "Arrow" button to login to Account Manager

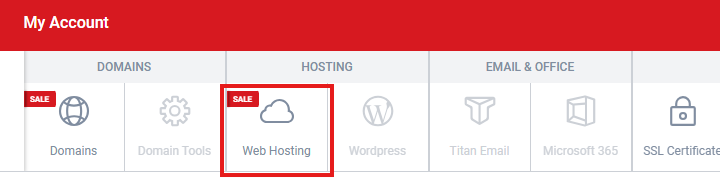
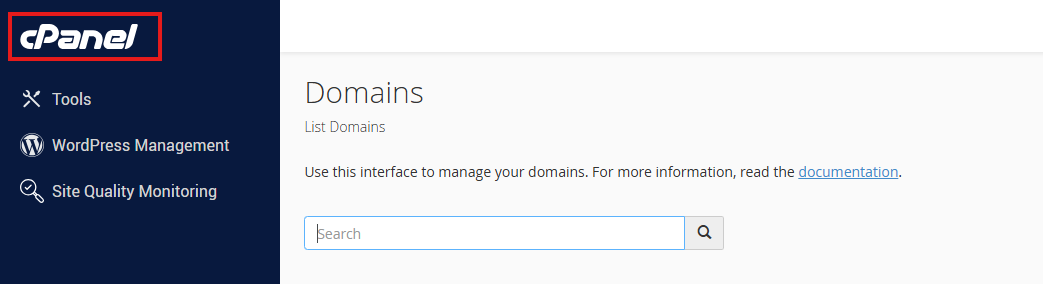
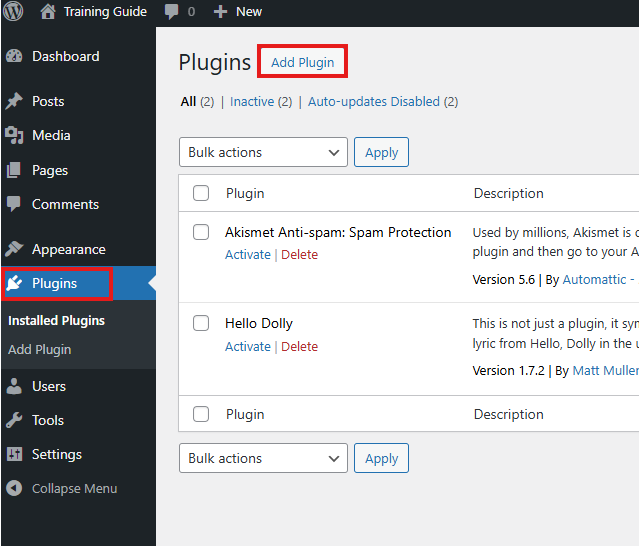
How to Access Cpanel
For Crazy Domains
Look for the domain, then look for the hosting availed. Click Manage button
Once redirected to hosting dashboard, click Login to cPanel button.

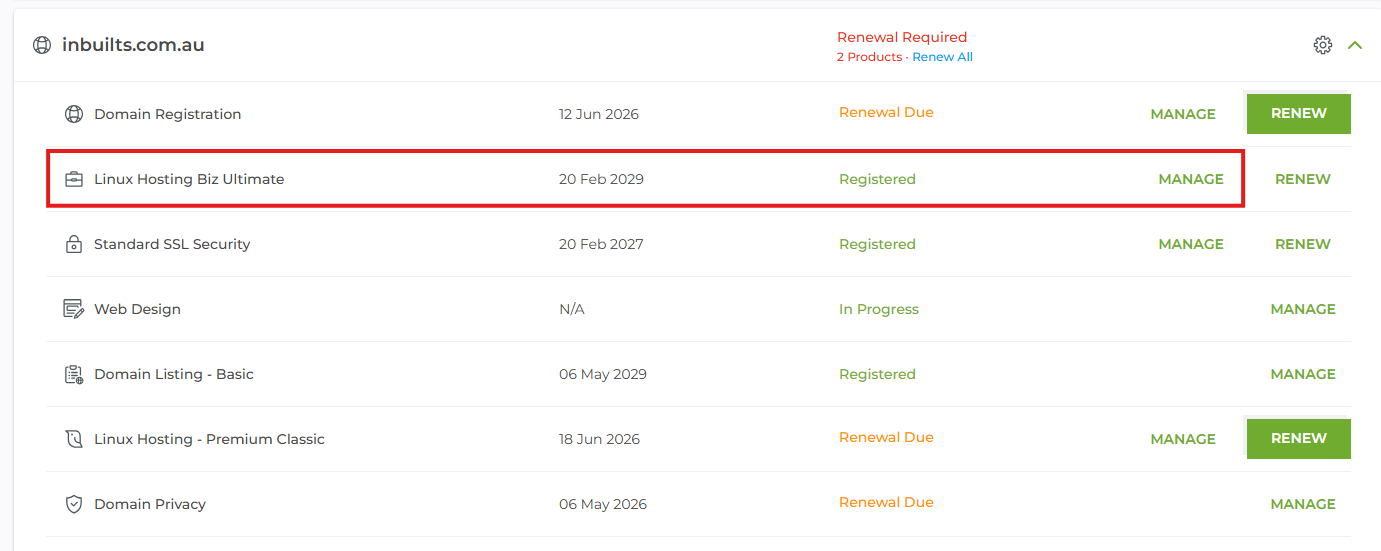
For Digital Pacific
No account manager access for all Digital Pacific products, however you may directly ask for the cPanel access from your designated leader(s).
For Vodien
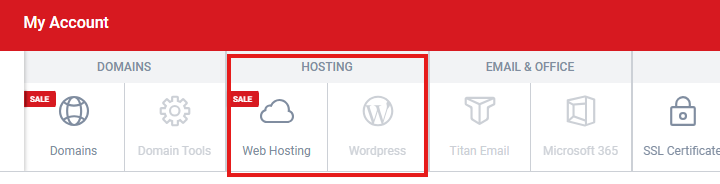
Look for the Hosting tab.
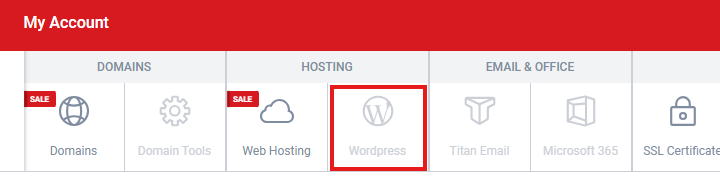
If client availed Wordpress hosting, there's no Cpanel and wordpress is already installed, you may proceed to development setup.
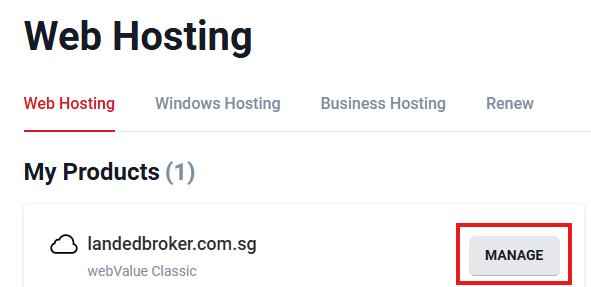
If client availed Web Hosting/Windows Hosting/Business Hosting, click Web Hosting tab.
For this example we will be using Web Hosting.. Click Manage button.
It will redirect you to the domain settings. Hover over the 3 dots icon then click Control Panel

Create Staging Domain
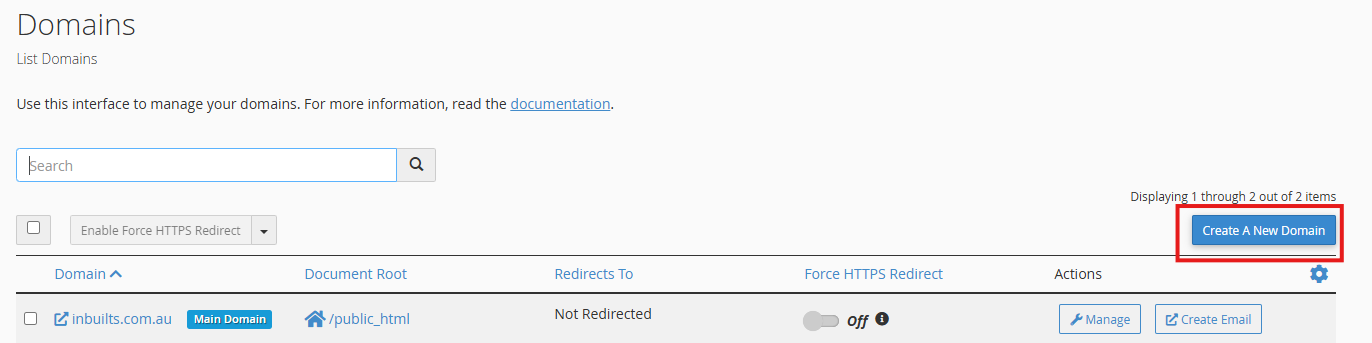
Once logged in to cPanel, scroll down. Under the Domains section, click Domains tab.

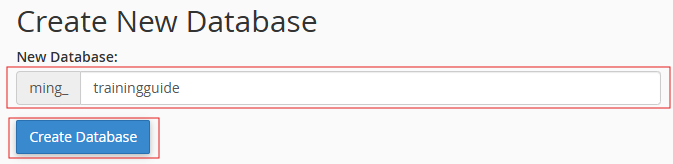
Click Create a New Domain button,
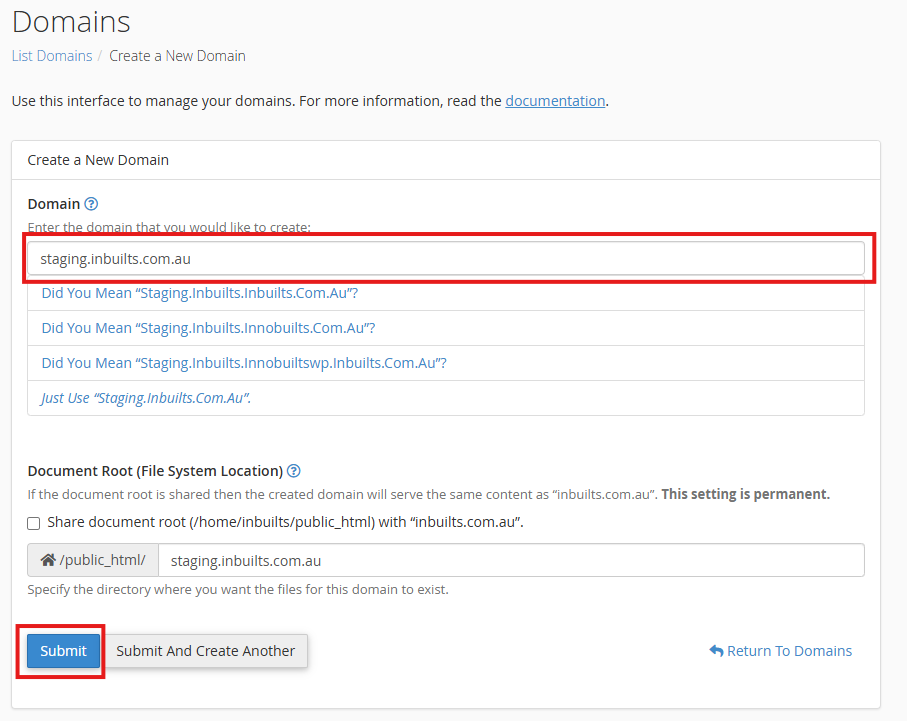
In the domain field, input the default staging domain which is staging.[domain name]. In this example we will be using staging.inbuilts.com.au. Then click Submit button.
After creating the domain, it will redirect you to Domains Dashboard, click cPanel label to go back to cPanel Dashboard and proceed with the remaining configurations.
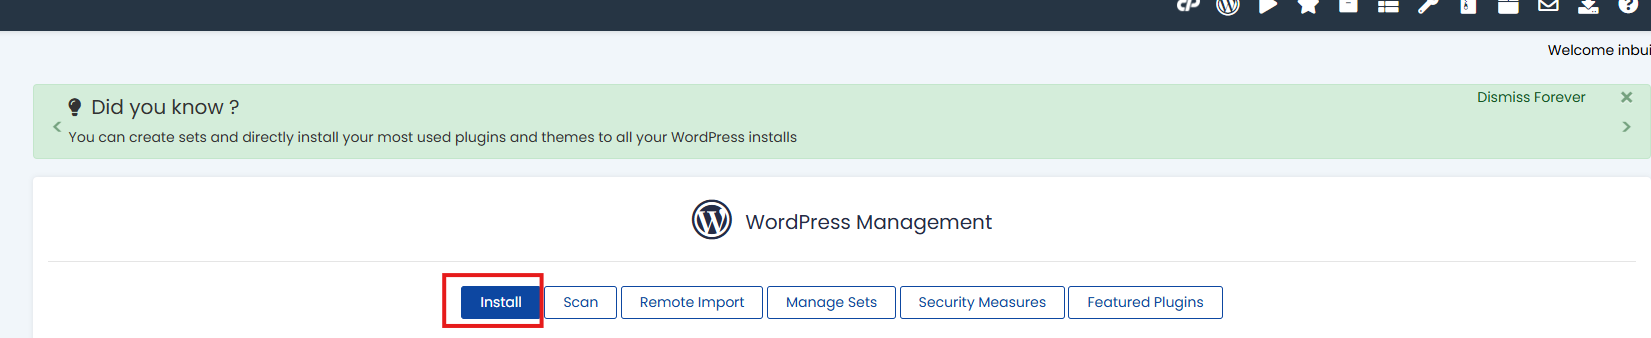
Create Setup Using Softaculous
Once logged in to cPanel, scroll down. Under the Software section, right click Wordpress Manager by Softaculous and choose open link to new tab. This is to make sure cPanel dashboard remains accessible.

Inside Softaculous Dashboard, click the install button. It will then redirect you to wordpress installation setup.
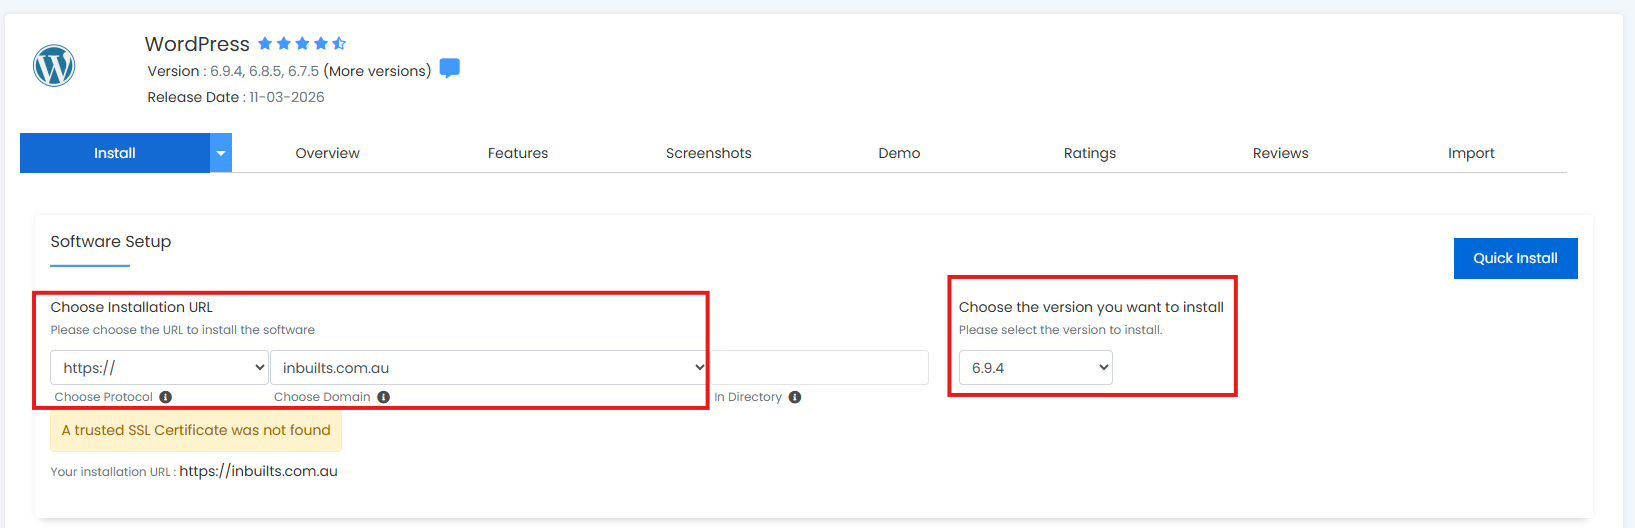
Choose https:// for the protocol and the staging domain created. In this example, let's pretend we are using staging.inbuilts.com.au. Choose the latest WordPress Version. Then scroll down.
Note: This is an official account so we can't proceed with the domain creation.
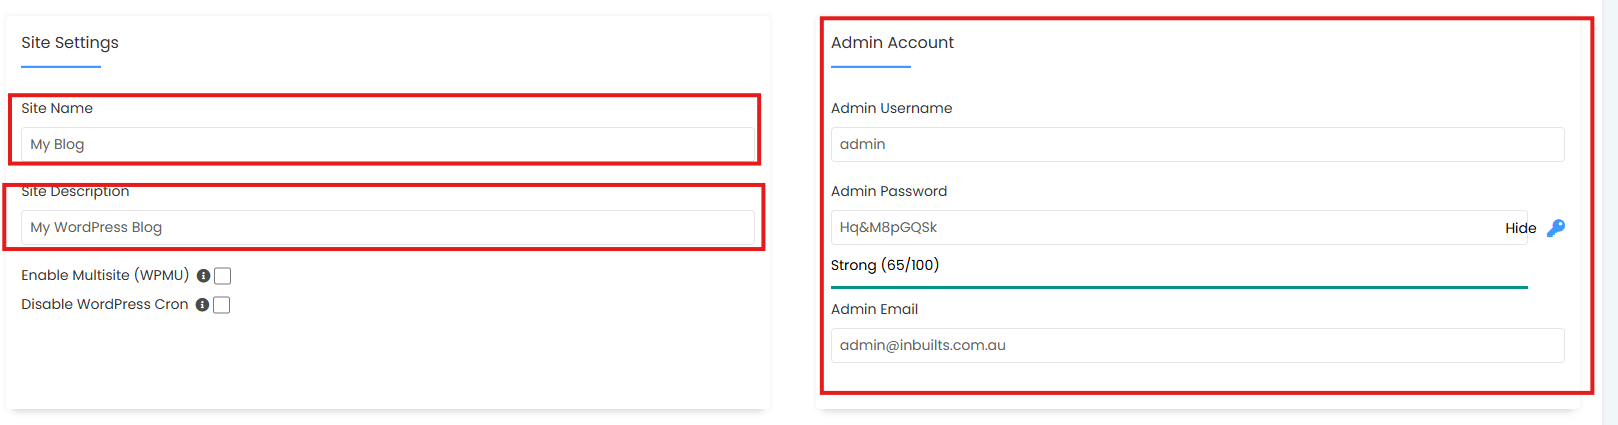
Under Site Setting, replace Site Name with the business name and Site Description with the tagline/slogan.
Under Admin Account, replace Admin Username, Admin Password and Admin Email with the default login credentials. Note: Ask assistance from ATL/TL.
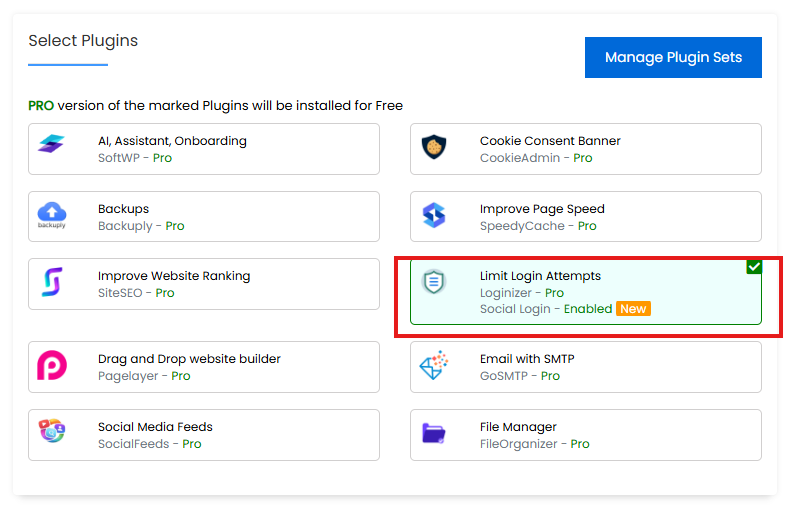
Under Select Plugins section, uncheck all plugins except for Limit Login Attempts.
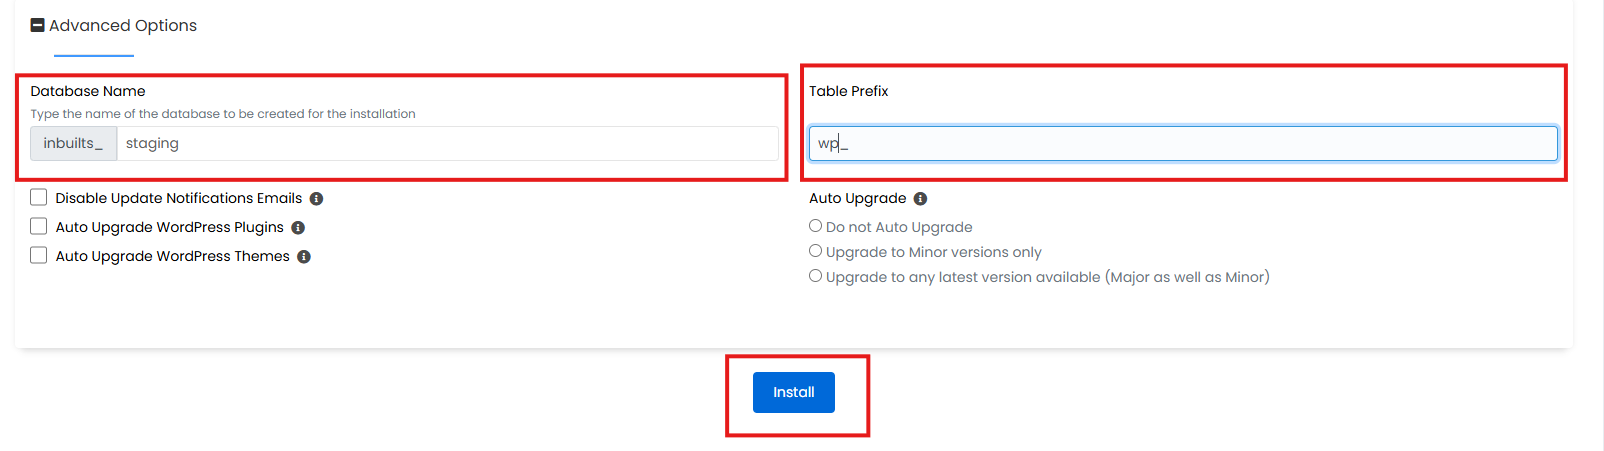
Under Advanced Options section. Add proper Database Name and Table Prefix, use wp_ for standard WordPress prefix. Then click Install button.
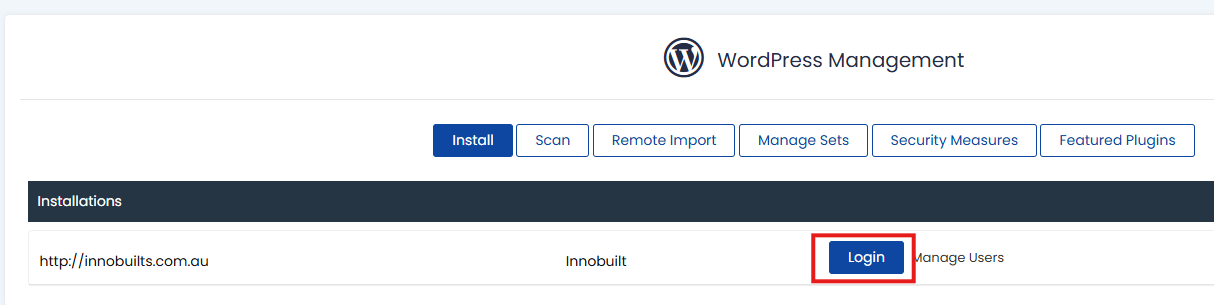
Once installation is successful, it will redirect you back to WordPress Management Dashboard, then click Login button to login to WordPress dashboard and start the setup.
Staging Setup Guide For VPS(Developer) Hosting
This guide provides a step-by-step instructions for setting up a website on our VPS hosting. It covers essential tools, installation processes and configuration settings to help you create, test and develop your website efficiently before deploying it online.
Create Domain
Login to cPanel, using admin credentails. Note: Ask assisstance from your ATL/TL.
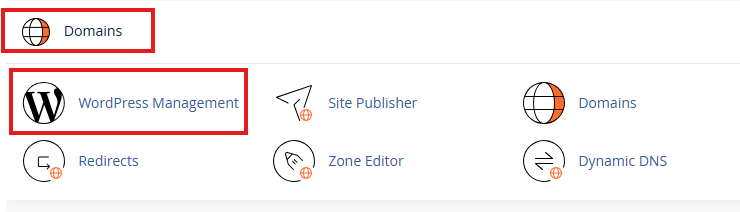
Once logged in, scroll down and look for Domains section and click Domains link.

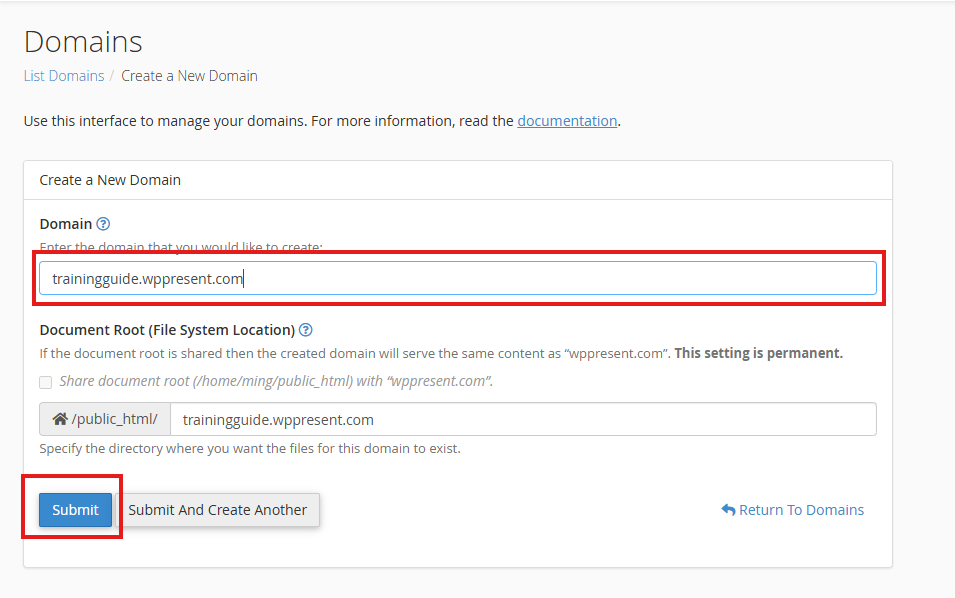
Click Create A New Domain button.

Use business name as domain and use wppresent.com as domain extension. It will automatically create a sub folder. Then click Submit button.
You will be redirected to domain lists, search for the domain you created and check if it is secured. If not enable Force HTTPS Redirect.

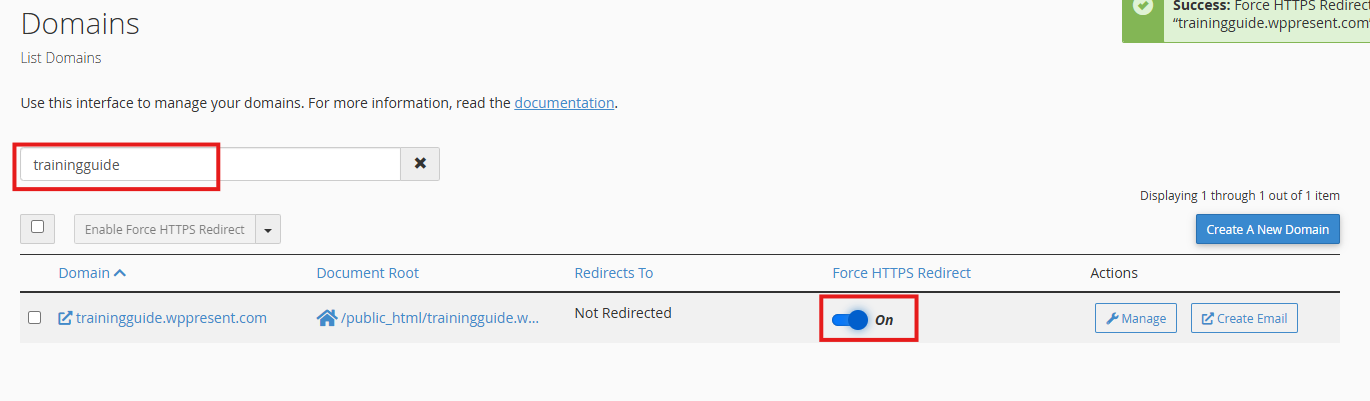
If restricted to enable, go to cPanel Dashboard. Scroll down and click SSL/TLS Status under Security section.

Search for the domain. It should be red, just check the domain and click Run AutoSSL button. These is a rare occurence since ssl is already set to all newly created domains.

Using Wordpress Management
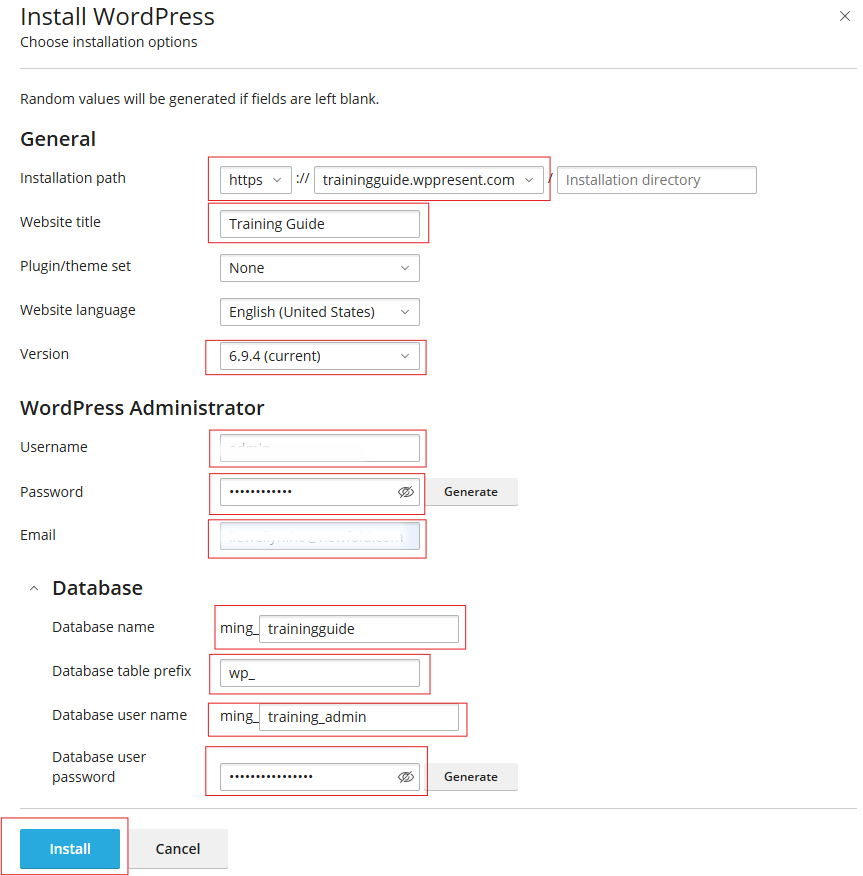
Under domains section, click WordPress Management. Then click install.

A sidebar will slide-in, input required data. This is somewhat similar to Softaculous. Click Install once done. Just like Softaculous once installation is done, you can proceed with setting up wordpress.
Manual Setup
For manual setup, download the latest wordpress version in there official website, https://wordpress.org/download/. Once done, access cPanel using the admin credentials. Note: Ask access from your ATL/TL.
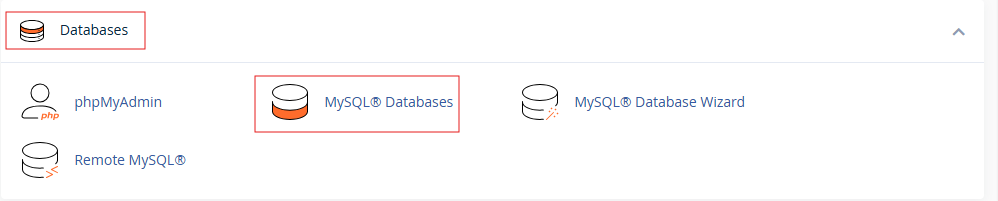
Open MySQL® Databases under Databases section.
Input database name, make sure you copied the database name in any text file. Then click Create Database. Then click go back.

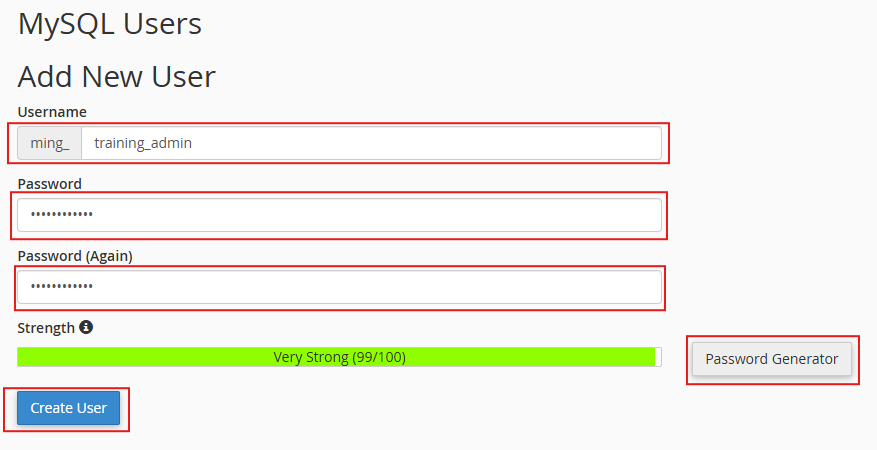
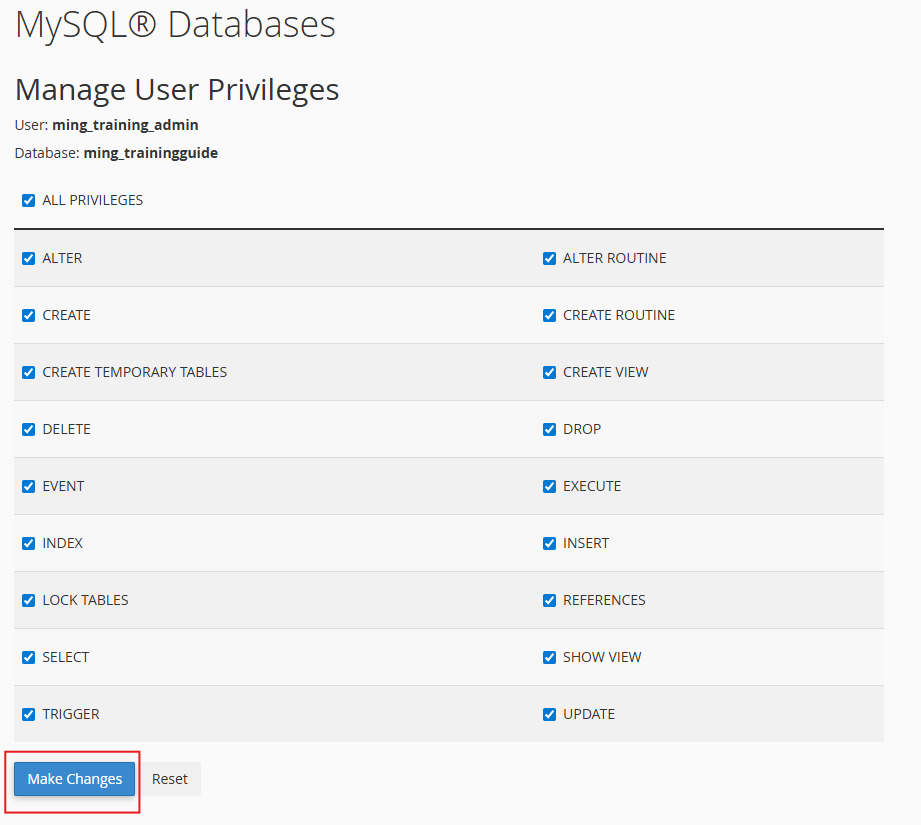
Scroll down and create a database user profile under MySQL Users Add New Users section. Input required data. For the password, it is recommended to use the built-in password generator but make sure you copied your chosen password. You may create/use your own as long as it pass password strength test. Click Create User once successfully created, click Go Back.

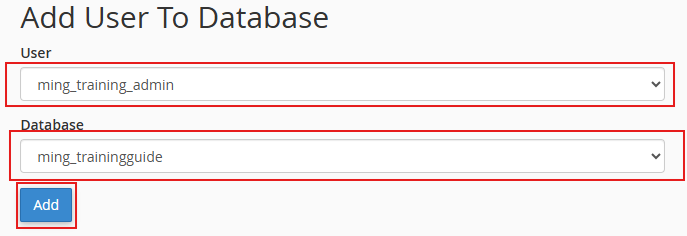
Scroll down to Add User To Database section, select the database user and database name you created. Click Add.
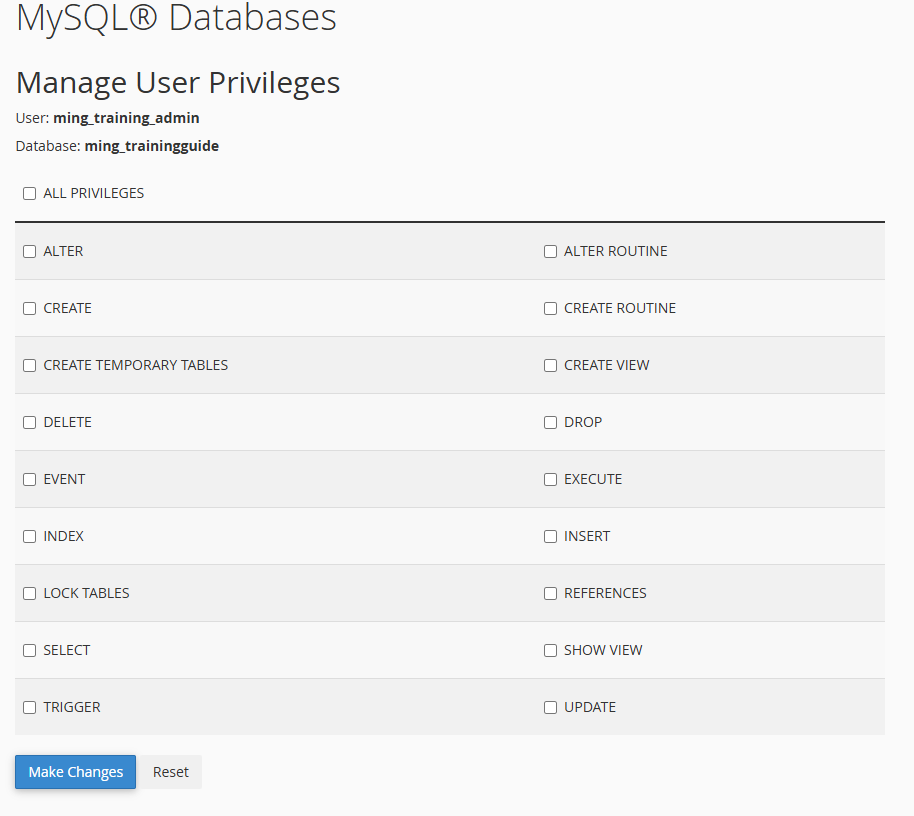
Check All Privileges to all user to modify or configure this specific database. Click Make Changes, a prompt will pop up at the top right corner of the screen once you successfully modified the privileges. Then click Go back, or click cPanel logo to proceed with the remaining steps.
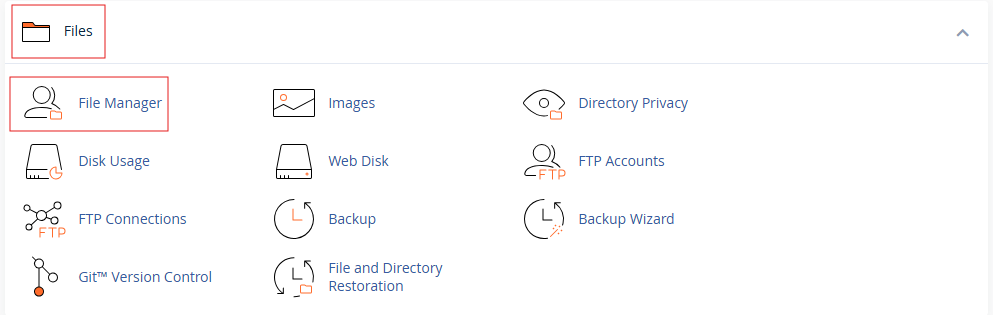
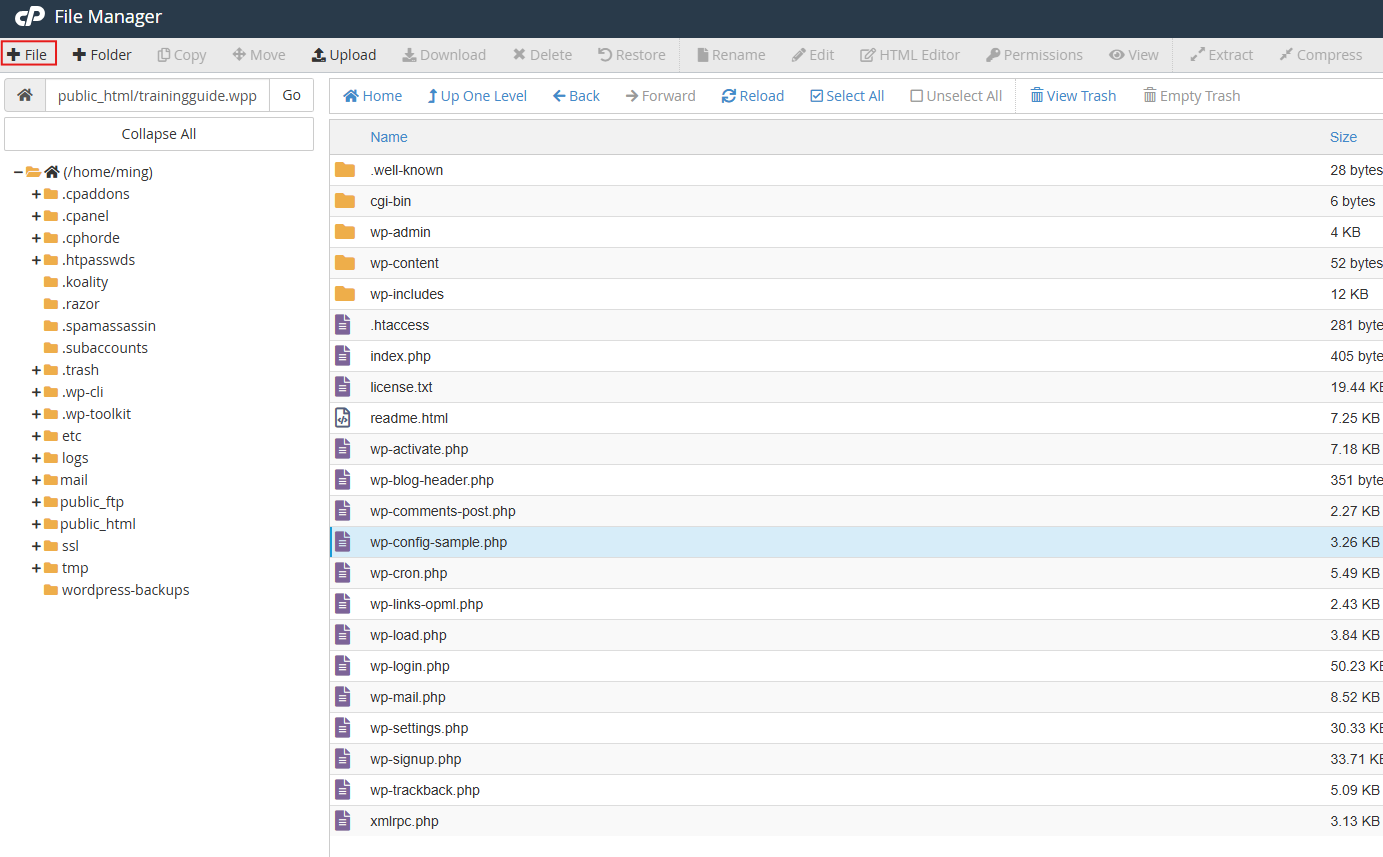
On the dashboard, scroll down and open File Manager under Files Section.
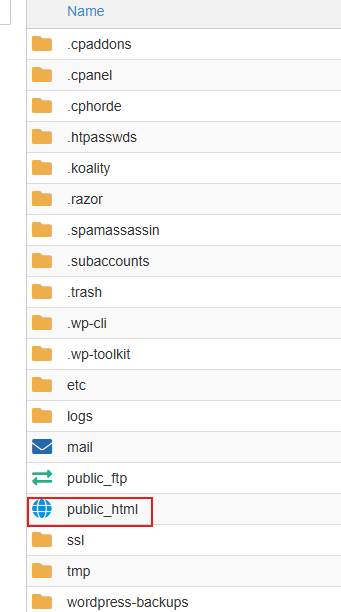
Open public_html folder.
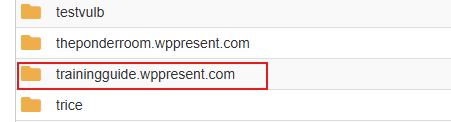
Scroll down and look for the folder with the domain you created then open that folder.
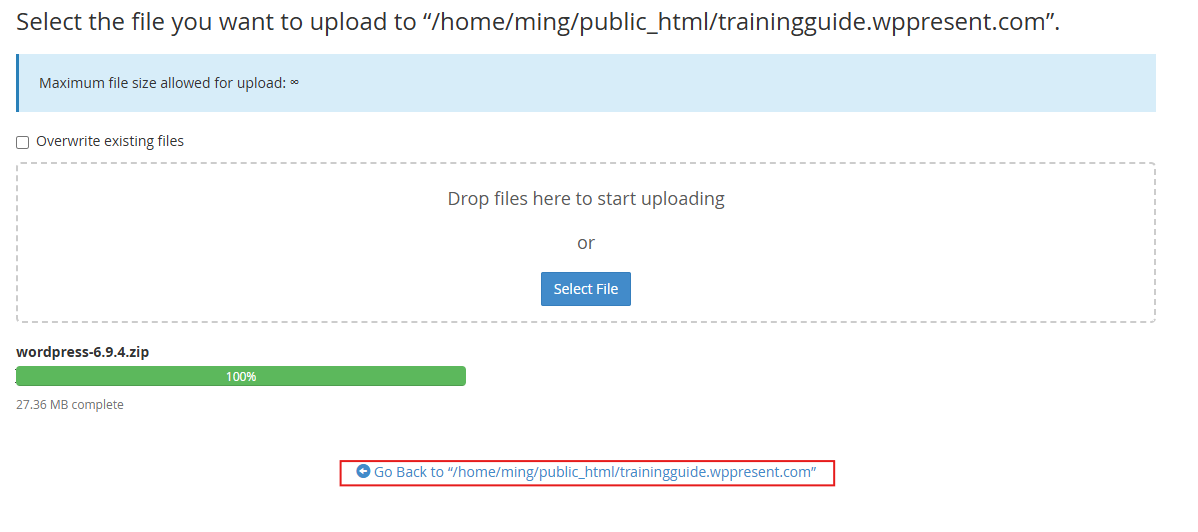
Click Upload. Drag and drop wordpress file you downloaded here. Once upload is completed, progress bar turns green. Click Go back.

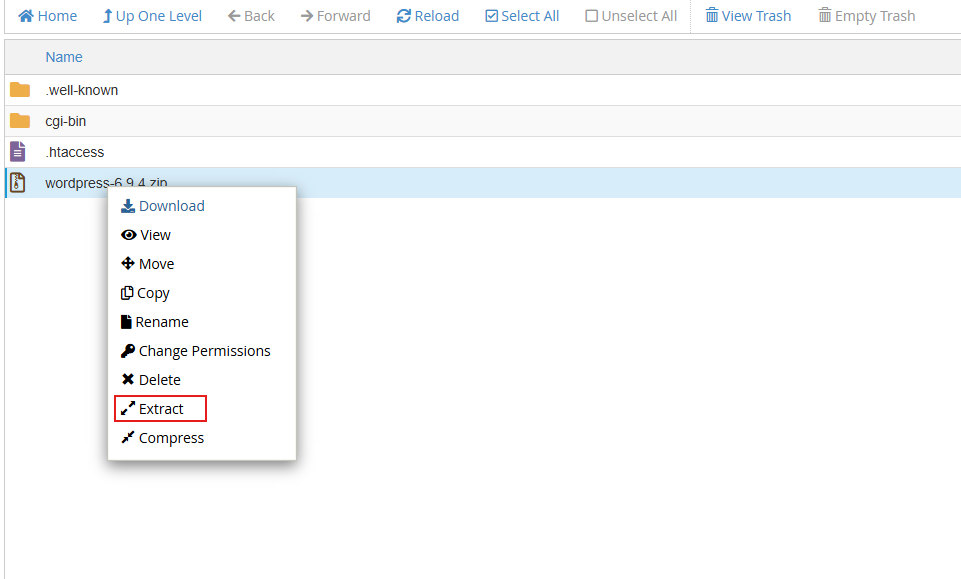
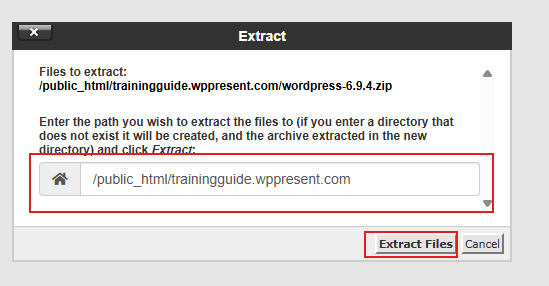
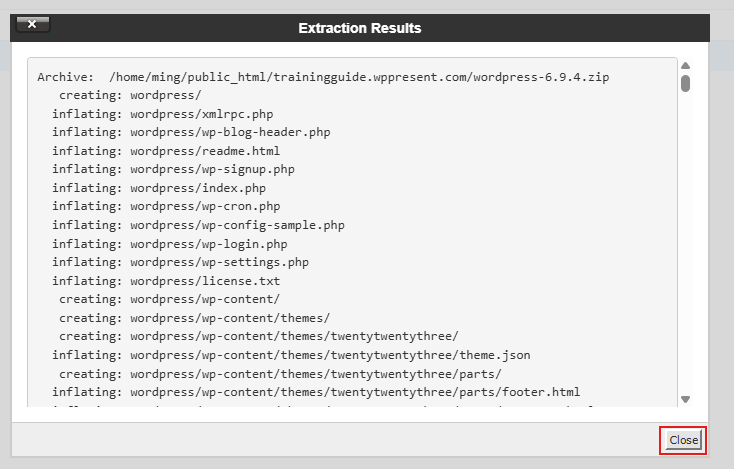
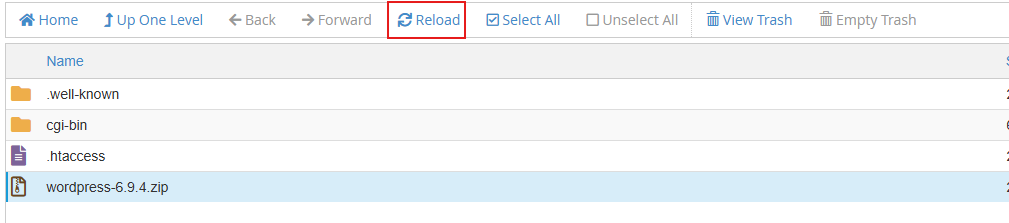
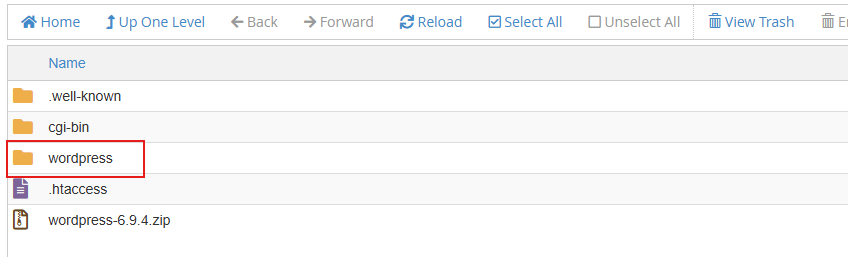
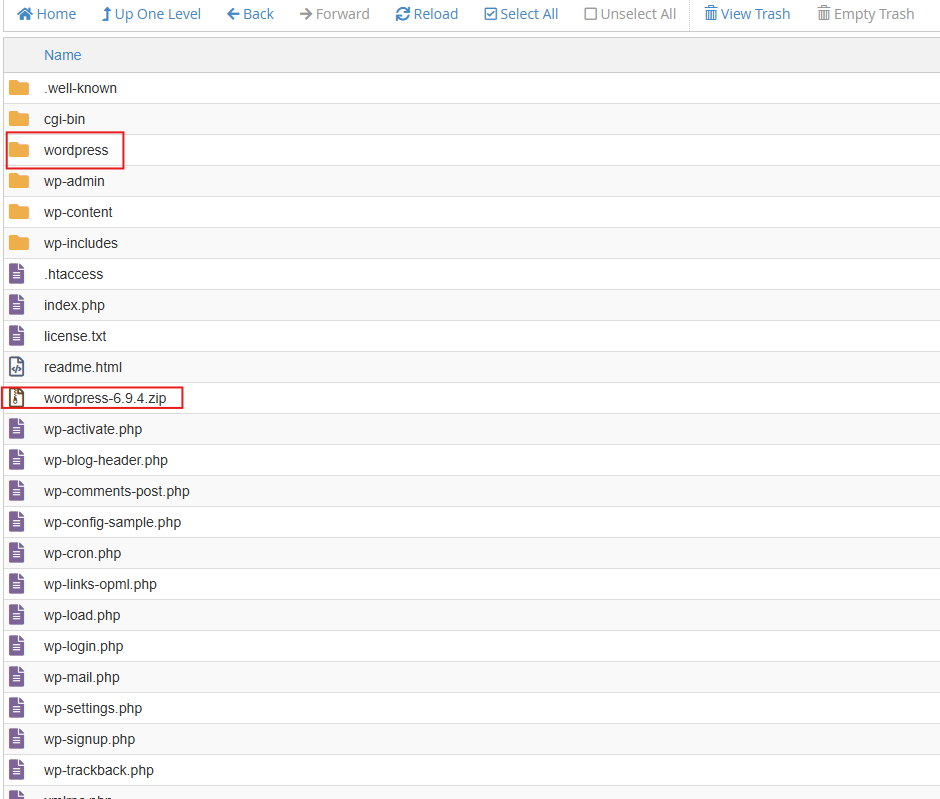
Extract files by right clicking the zip file then click Extract. A prompt will pop-up, make sure file destination is correct, then click Extract Files then click Close. Reload folder, do not refresh the entire page to not close this folder.
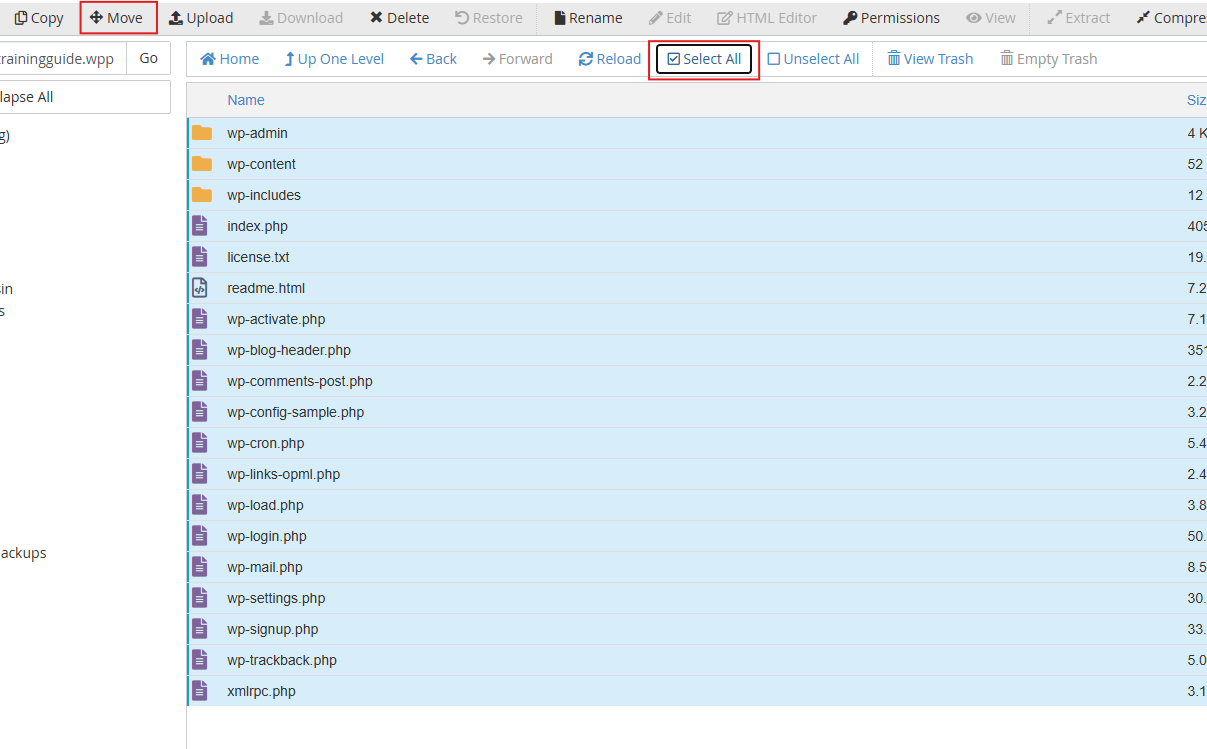
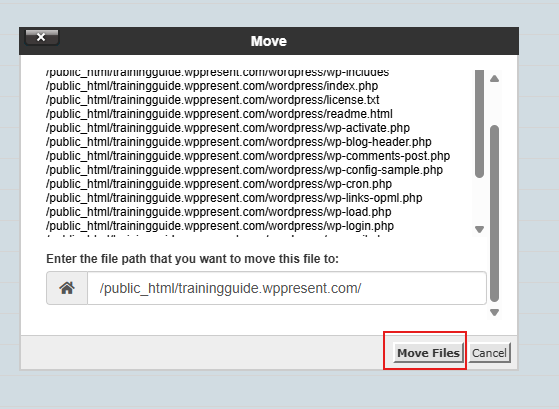
Open the extracted wordpress file. Check Select All checkbox then click Move. A prompt will pop-up, make sure files will be moved to its main website folder. Once directory is empty, click Up One level to go back to main folder.

In the main folder, remove empty wordpress folder and zip file to save storage space. Right click then delete, check skip the trash and permanently delete this files, then click confirm.
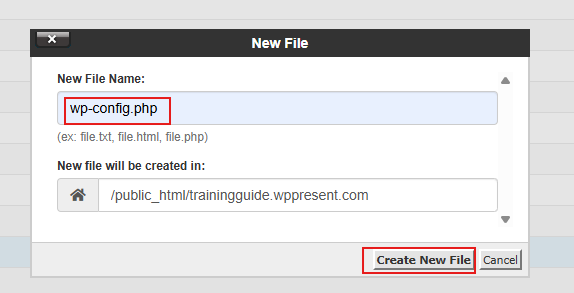
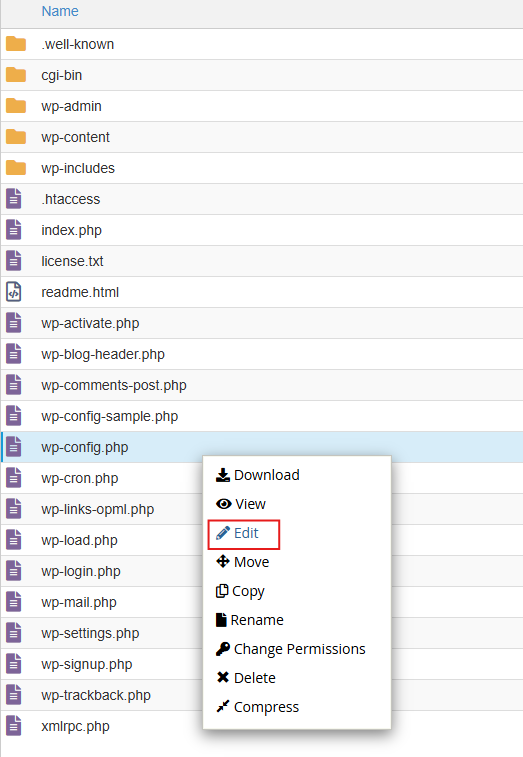
Click +File to add new file. Create wp-config.php then click Create New File. Reload once done.
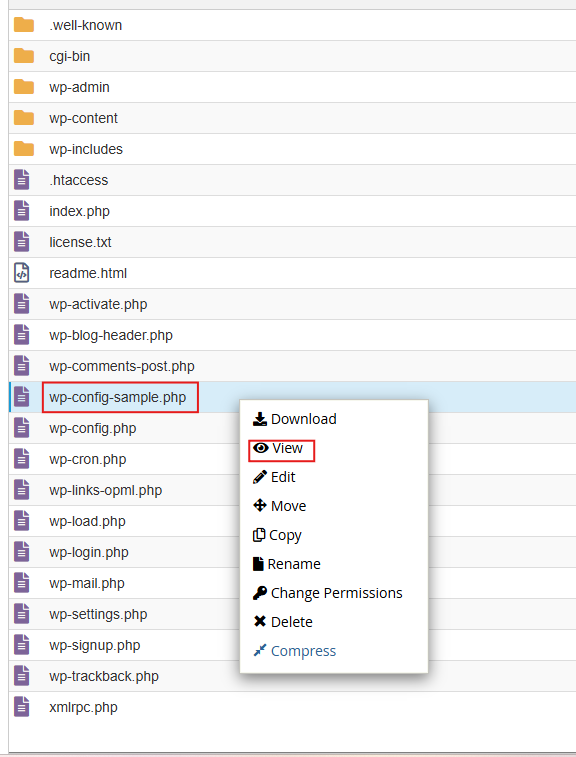
Right click wp-config-sample.php then click View to open. Do the same to wp-config.php file but click Edit instead of view.
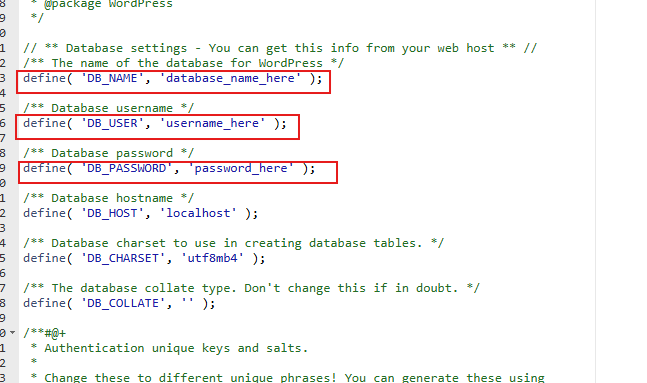
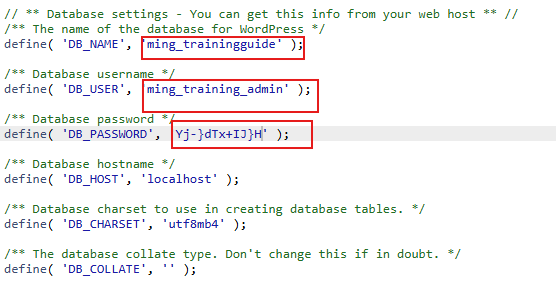
Copy all content from wp-config-sample.php file to wp-config.php. Then close wp-config-sample.php file to avoid confusion. Replace placeholder text with the actual database information.
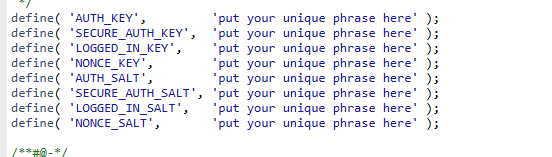
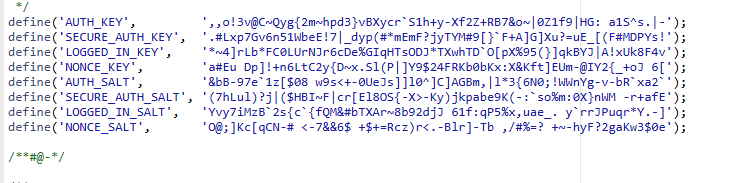
Replace the entire code from this link https://api.wordpress.org/secret-key/1.1/salt/ for secret keys.
Save Changes then close.

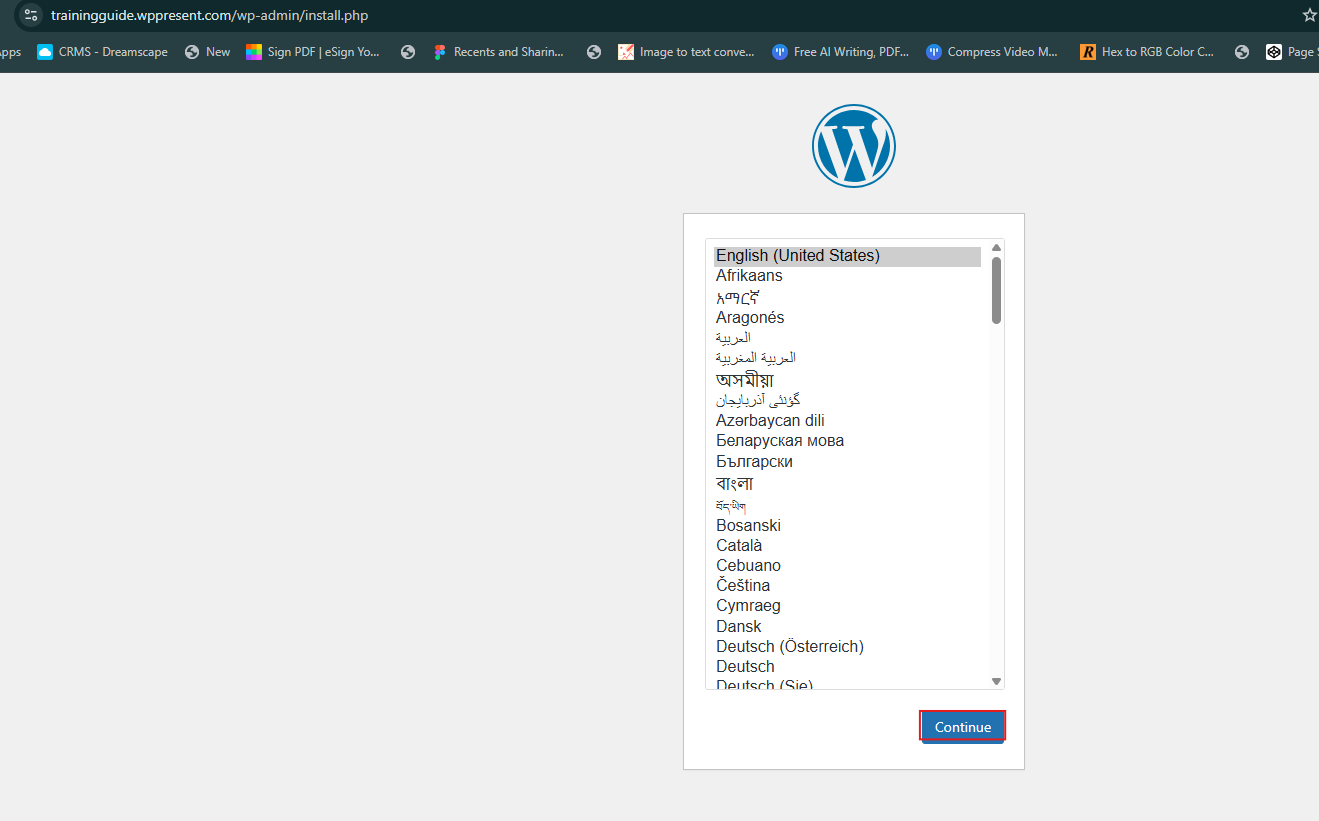
Open new tab and enter domain name to proceed with wordpress installation. Intall page will then load, just click Continue.
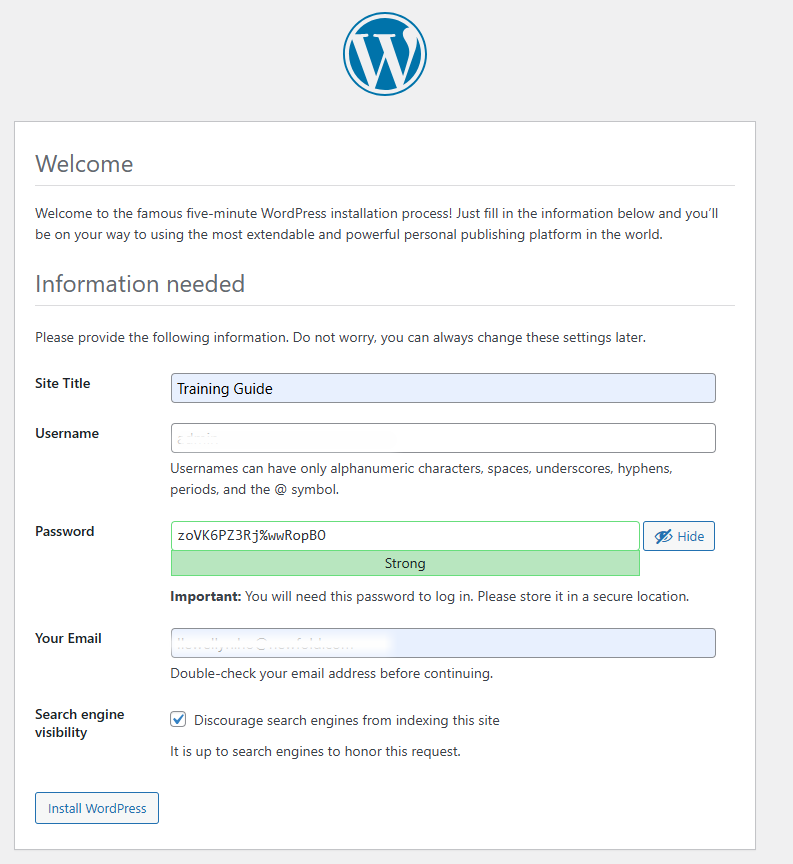
Enter business name as site title, default username and password, admin email then check discourage search engines from indexing this site. Proceed with installation.
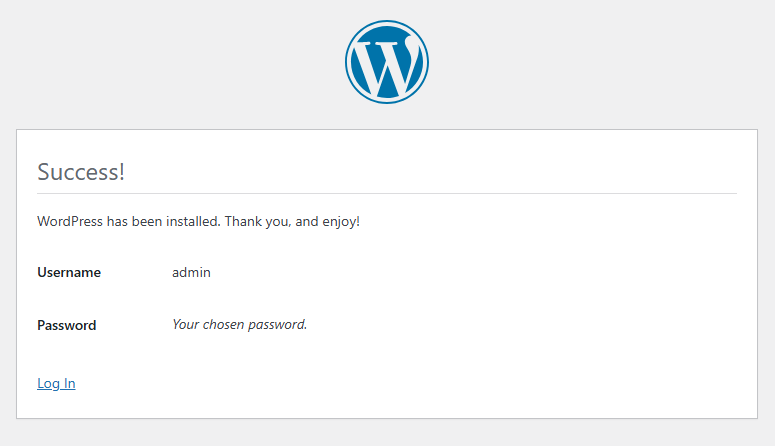
Once installation is successful, you may now login to admin dashboard and proceed with the development setup.
Wordpress Development Setup
This guide provides step-by-step instructions for setting up wordpress using the standard process and configurations needed for an optimized website.
Wordpress Front-end Setup
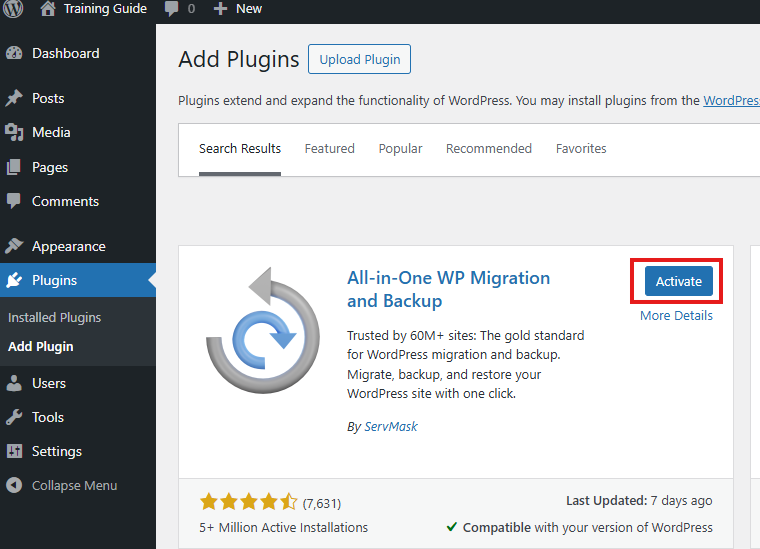
Once logged in, click Plugins Tab then click Add Plugins button.
Input All in one in the Search Plugins field. It will load multiple plugins but use All-in-One WP Migration and Backup by ServMask, then click Install button. Once done, click Activate button.

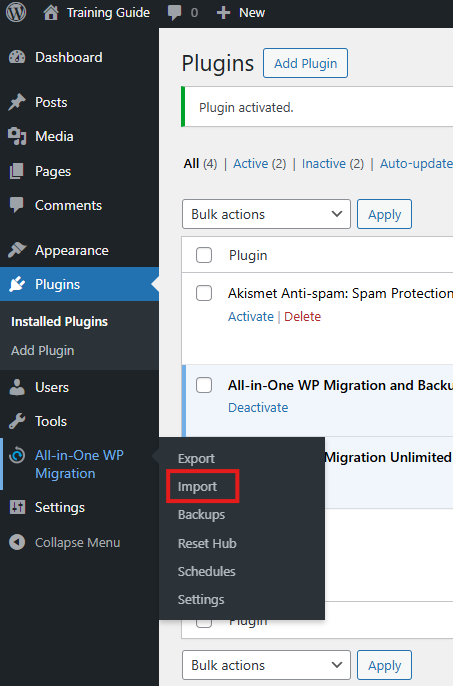
Hover over All-in-One WP Migration Tab, then click import.
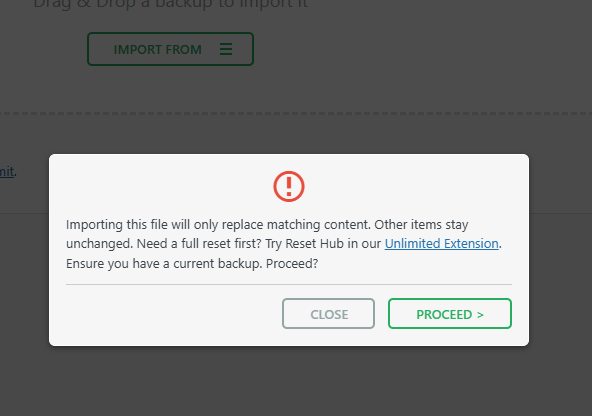
Drag and drop wpress file or click Import From button to import. Note: Ask assistance from ATL/TL to get the file needed.
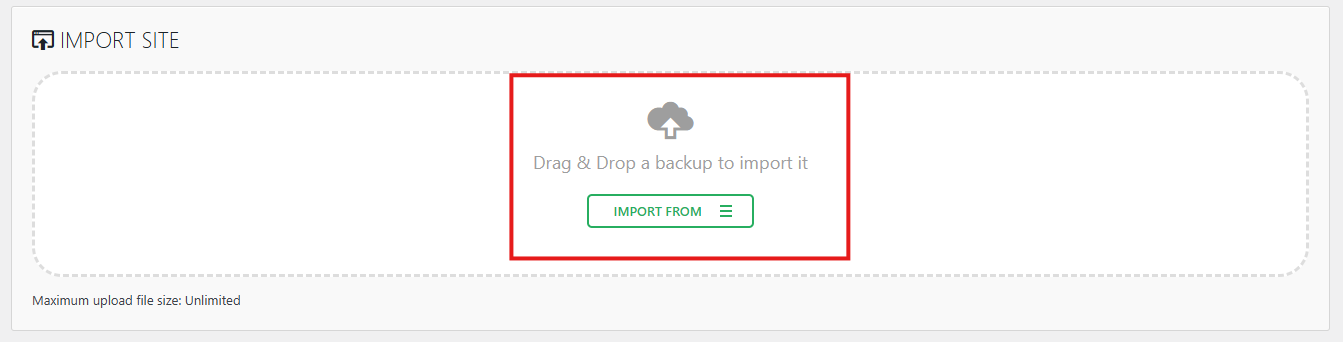
Wait for file to be successfully uploaded then click Proceed button.
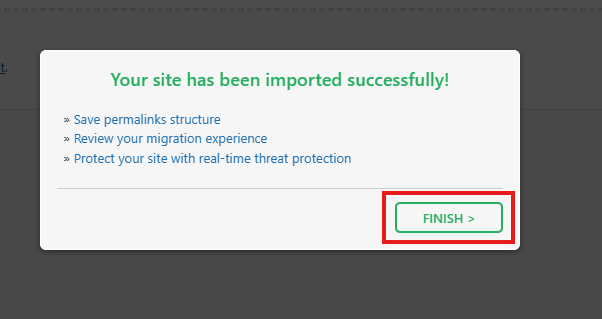
Once done, click Finish.
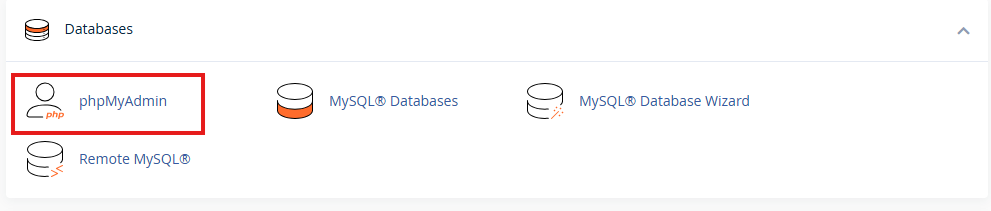
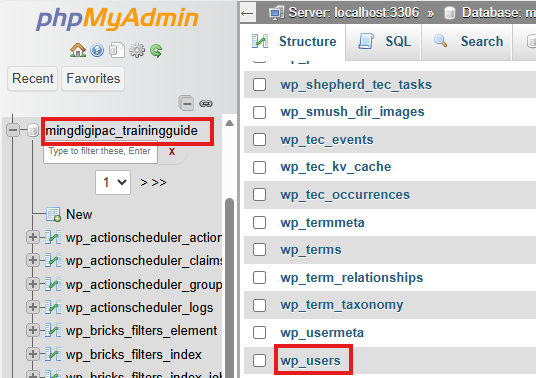
Go back to cPanel open phpMyAdmin under Databases section. Look for the database created, open wp_users table. ClickEdit to change credentials, once done just click Go button to save changes. Note: Make sure to use MD5 setting for the password for security.

Proceed with the remaining setup and remove unnecessary files, check list below:
Pages
Add pages by clicking Add Page button. Input page title then click Pubish
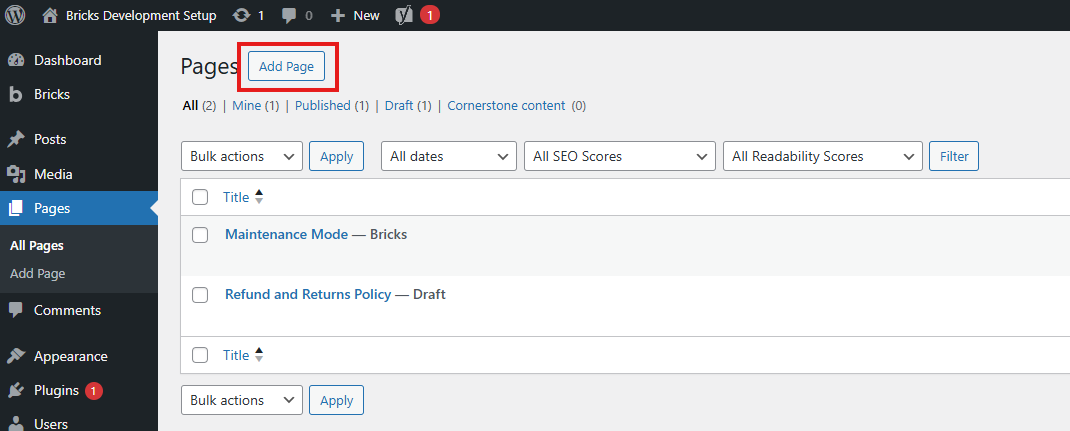
If client have an existing site, copy both SEO meta title and meta description, before you publish. Do the same with other pages.
Themes
Click Appearance then click Themes, delete other themes. Only keep Bricks and current year WP theme. Make sure all themes are up to date.

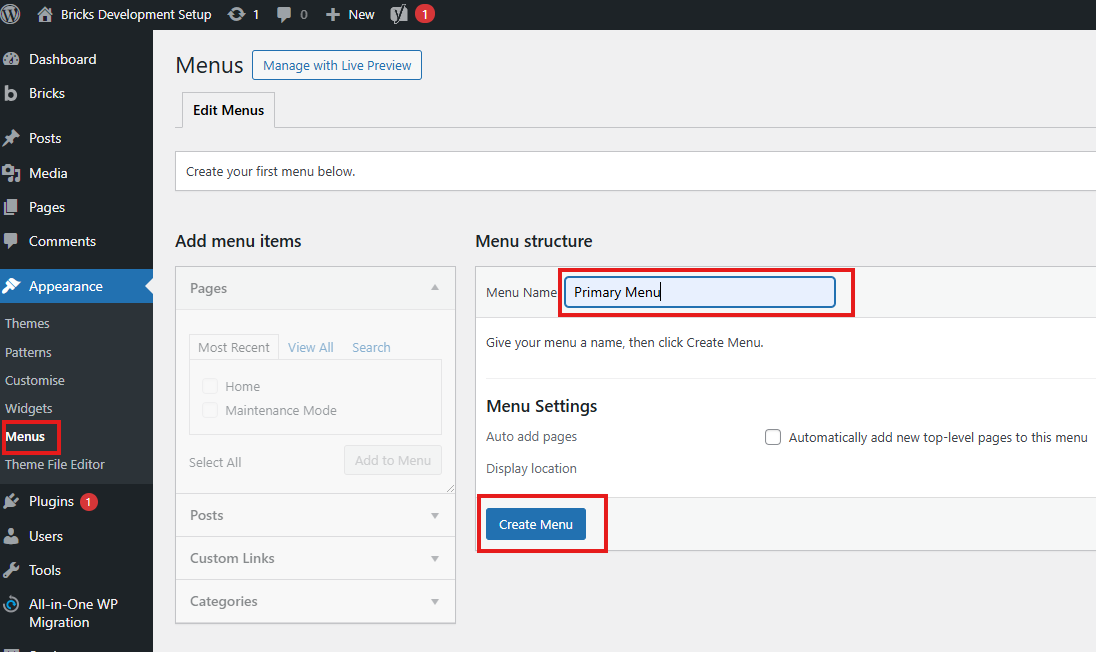
Menu
Click Appearance on dashboard, then click Menu. Enter Menu name Primary Menu then click Create Menu button.
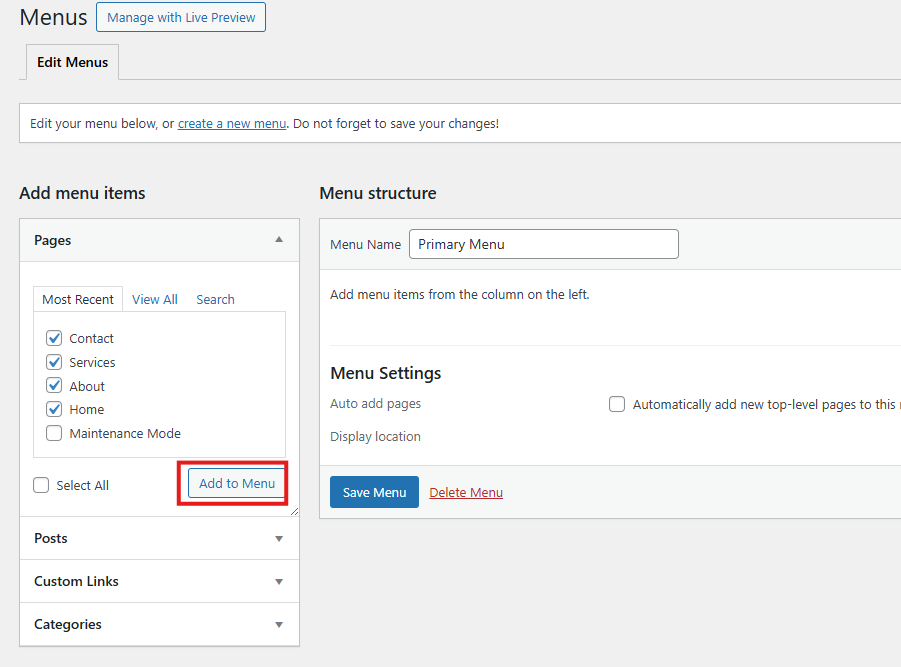
Add all created pages by checking Select All then Click Add to Menu button. Note: Do not include Maintenance Mode page.
Arrange menu according to client's request then click Save Menu button.
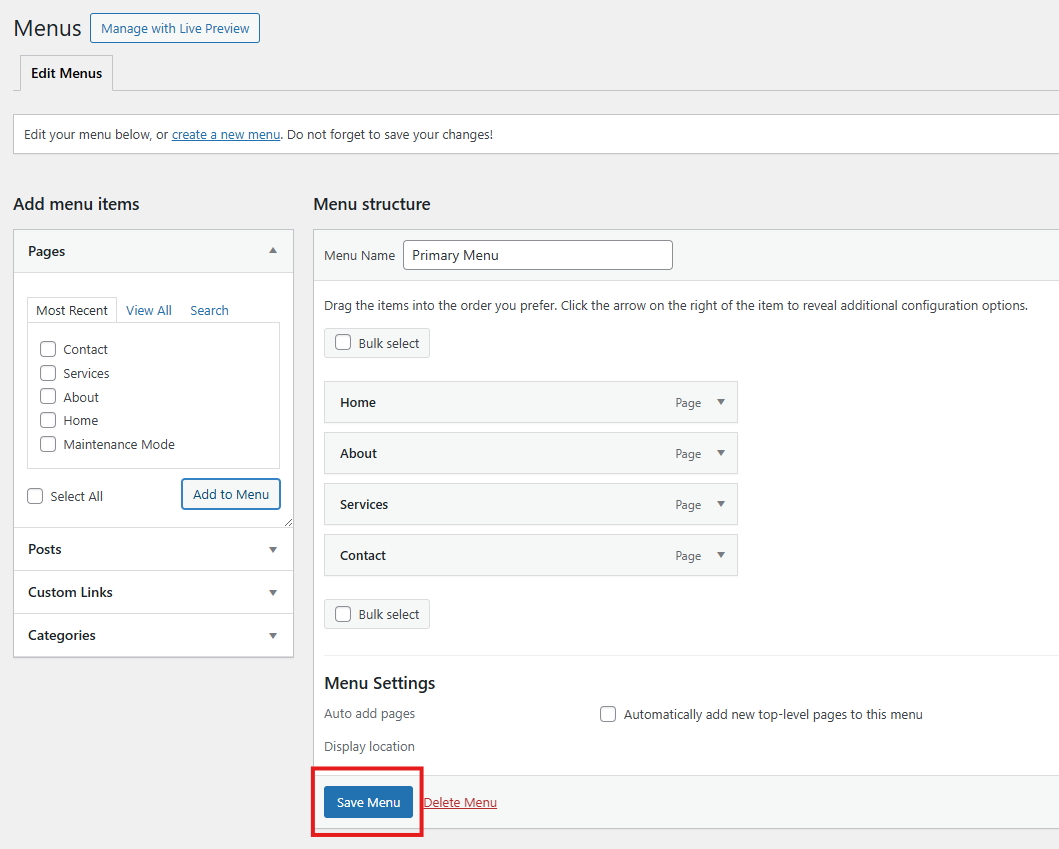
Be careful not to delete created menu(s), wordpress doesn't have the restore functionality for menus.
Plugins
Click "Plugins" then delete unnecessary plugins. Also delete unused plugins. Make sure all plugins are up to date.
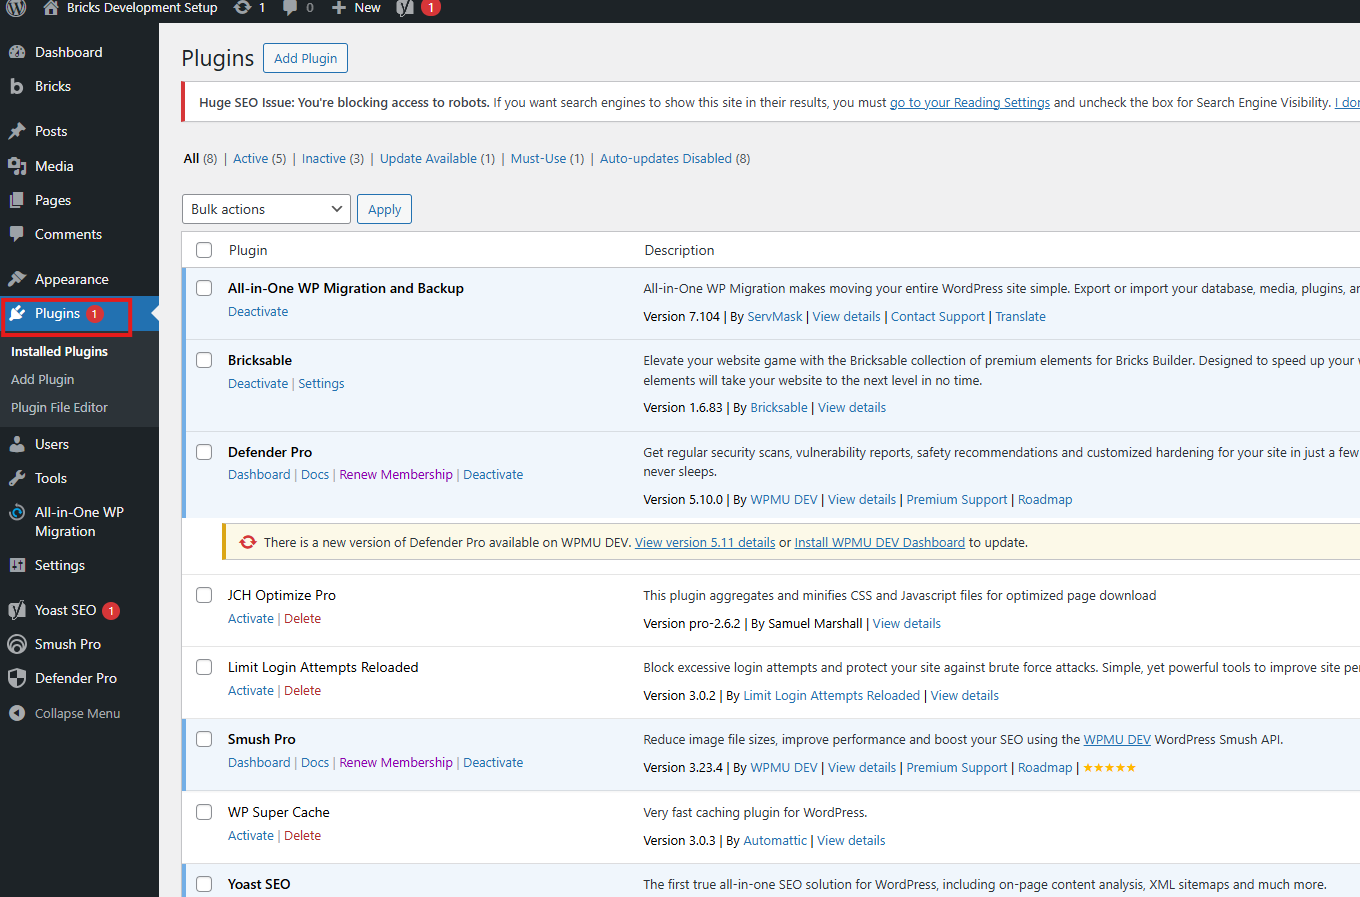
Note: Never delete required plugins which are Defender Pro, Gravity Forms, Hummingbird Pro / JCH Optimize Pro, Limit Login Attempts Reloaded, Smush Pro, WPMU DEV Dashboard and Yoast SEO. Other plugins can be deleted.kept depends on project type.
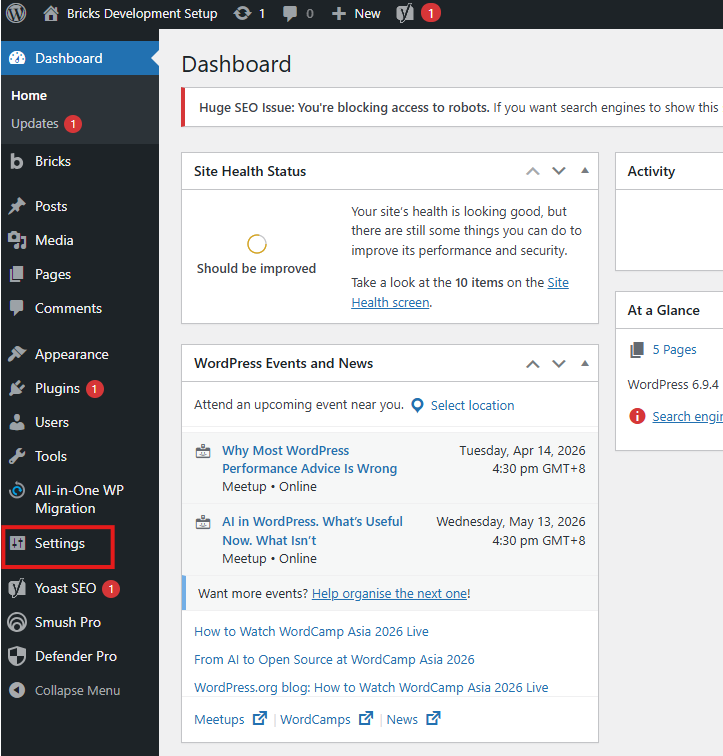
Settings
Click "Settings" on dashboard.
-
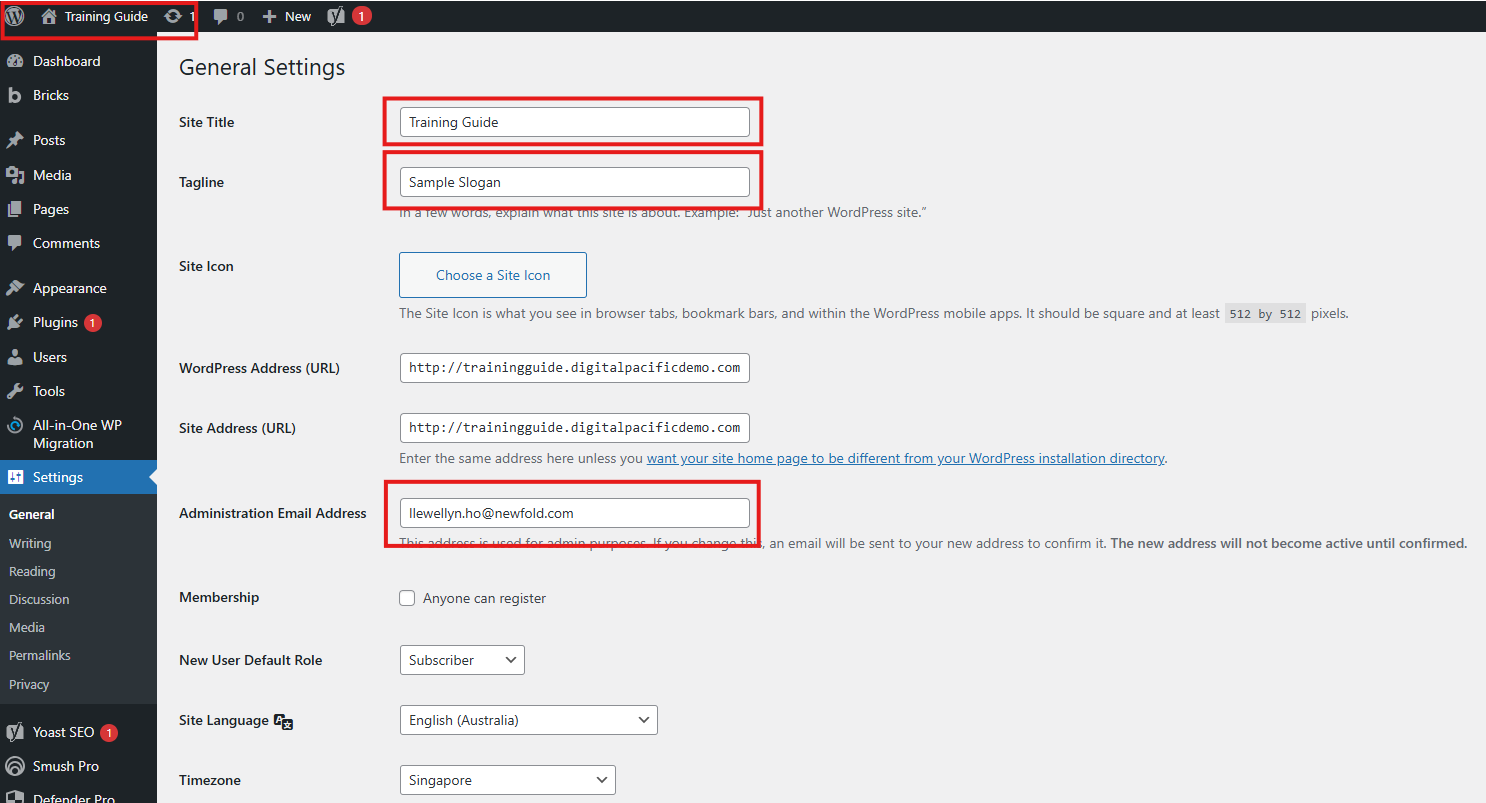
General
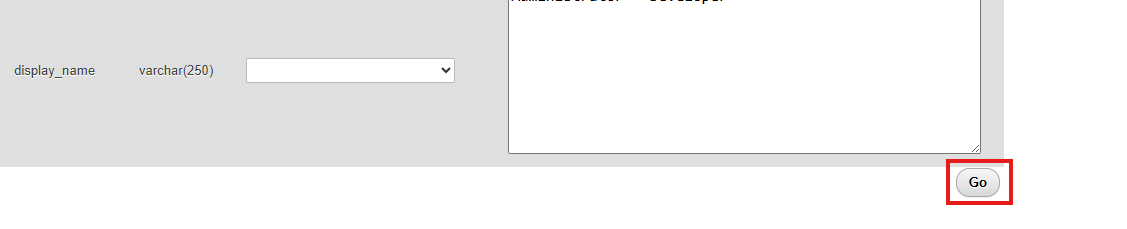
Update all info, refer to image below. Administration Email Address: Remove old admin email, click Cancel. Do this first(if prompted), to not lost any information added before you edit. Site Title: Use business name Tagline: Add tagline from creative brief if there's any. Leave empty if none.
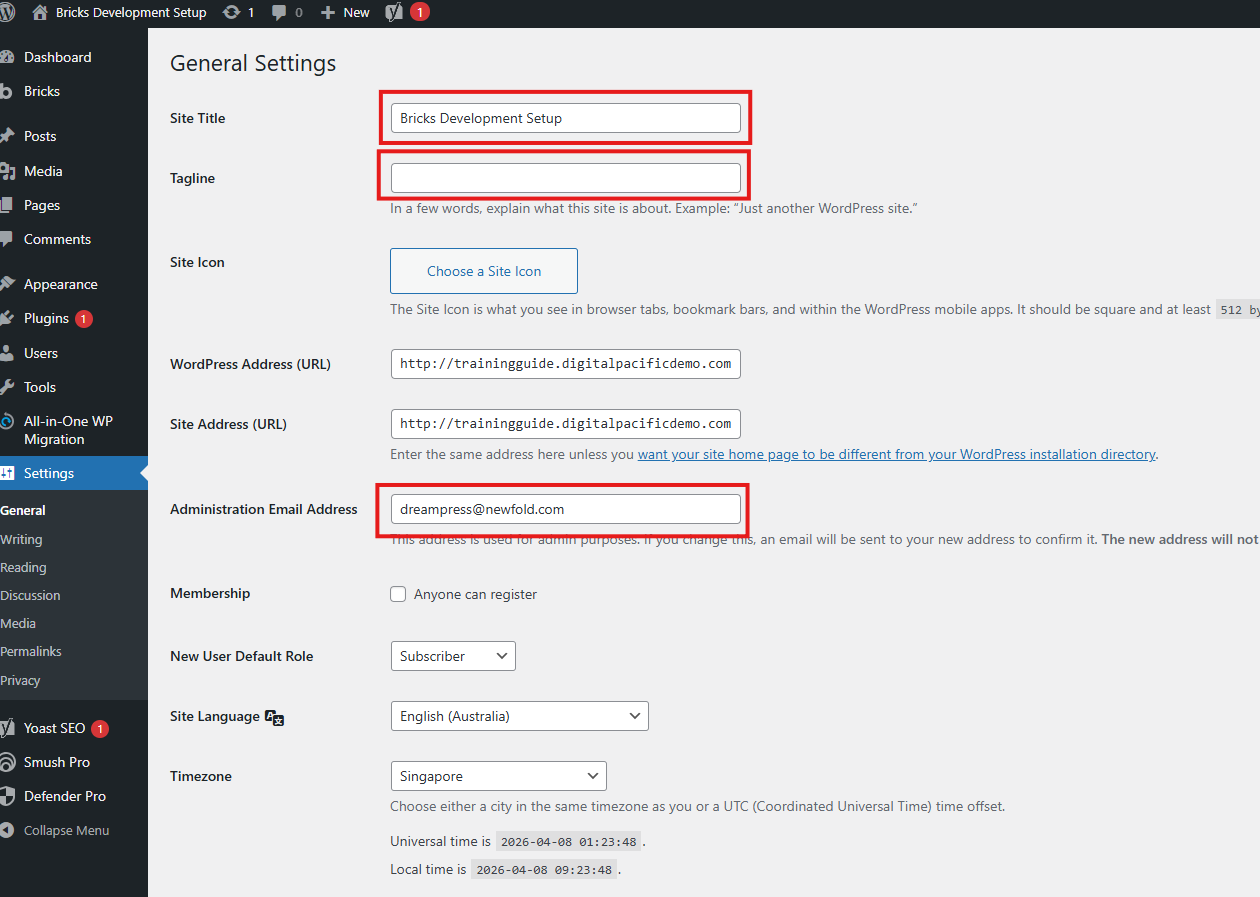
Click Save Changes. This is how it should look like, then
-
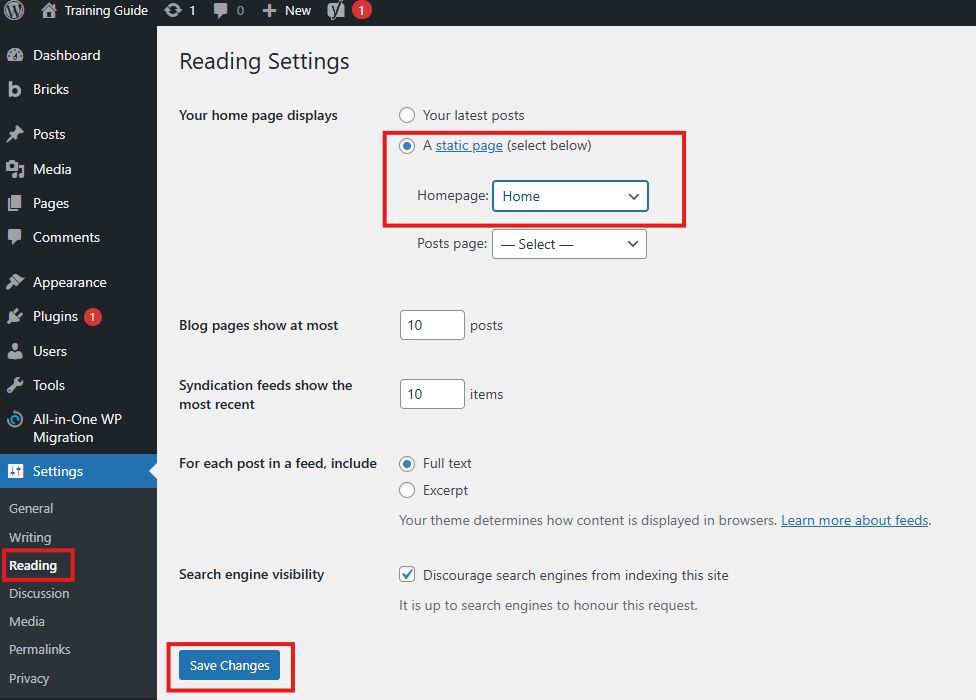
Reading
Click Reading, under Your homepage displays section click static page then choose Home (Depends on requested homepage title). If blog exist, under Posts Page choose the blog page title, if none leave it as it is. Then click Save Changes.
-
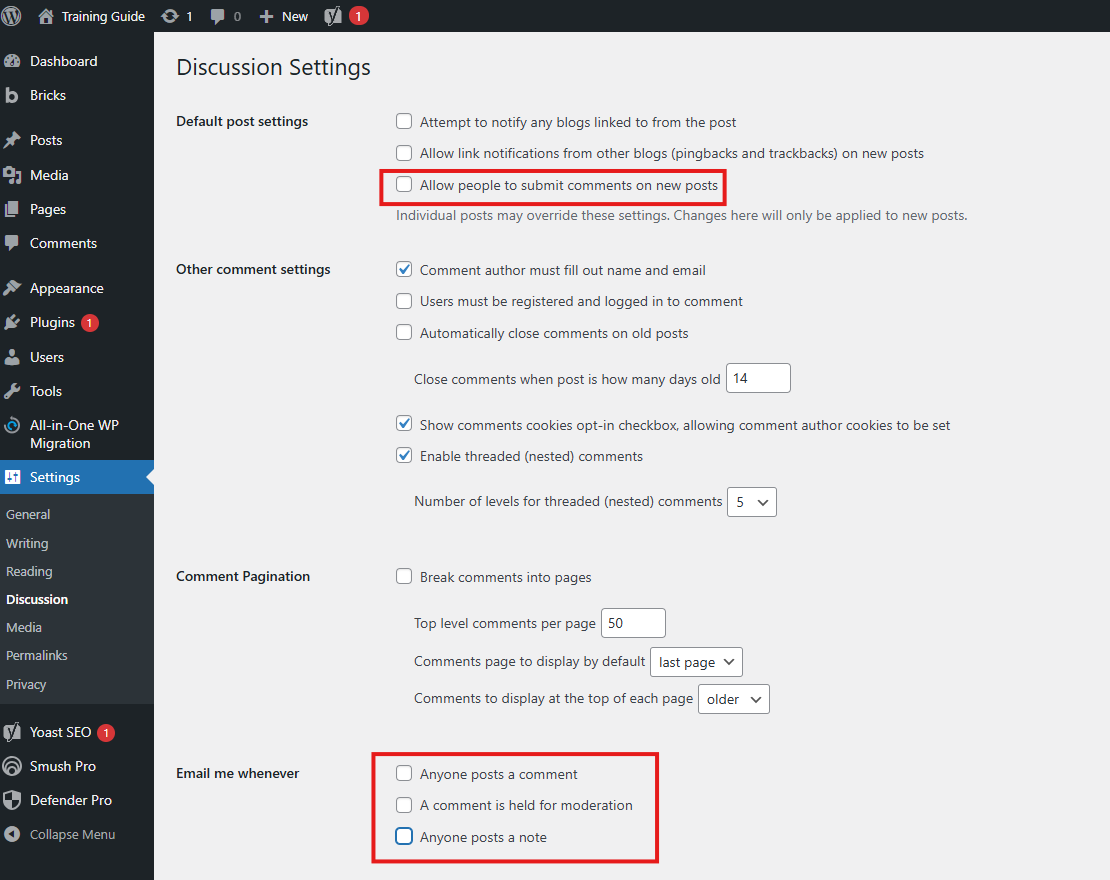
Discussion
Click Discussion, if blog exist, only uncheck Allow people to submit comments on new posts under Default post settings.
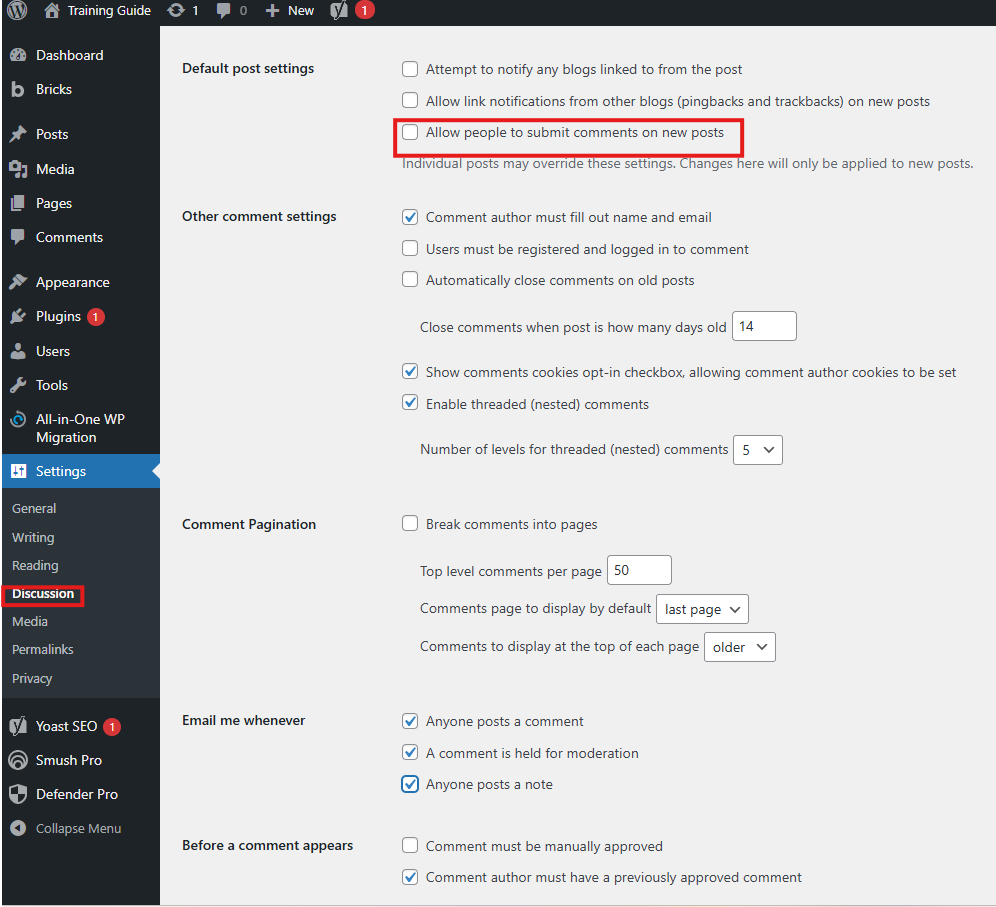
If none, uncheck Allow people to submit comments on new posts under Default post settings, uncheck Anyone posts a comment and A comment is held for moderation and uncheck Anyone posts a note under Email me whenever. Then scroll at the bottom, click Save changes once done.
-
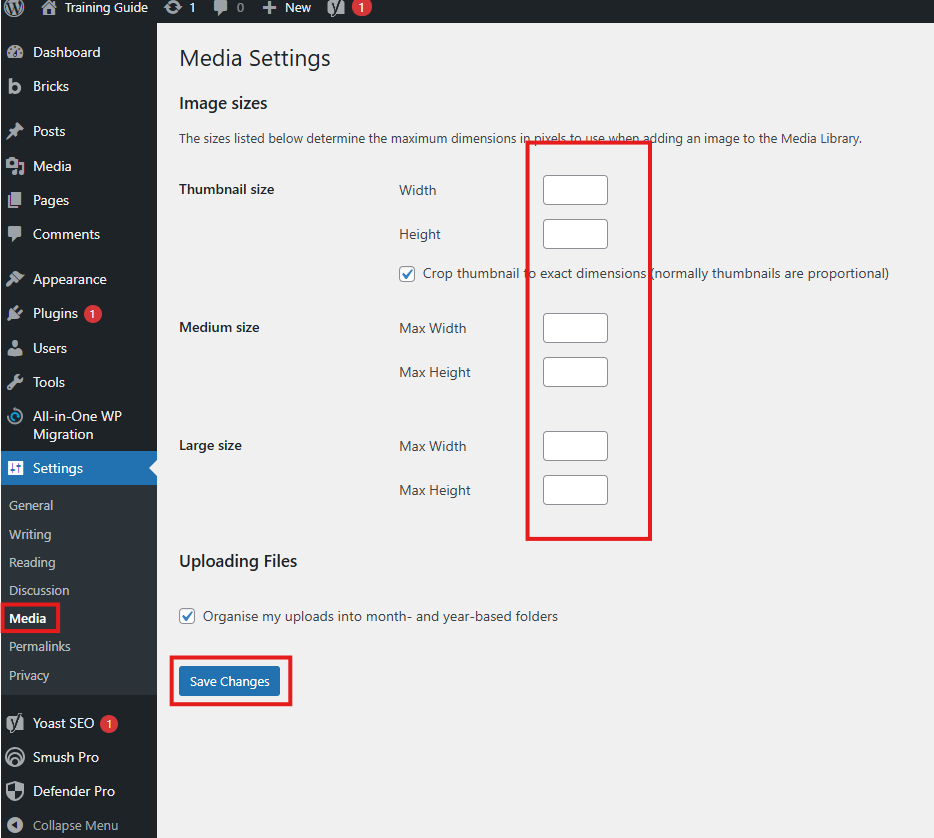
Media
Click Media, set all sizes to Zero(0), save changes once done.Note: This is necessary to avoid wordpress creating multiple copies of every images uploaded in different sizes.
-
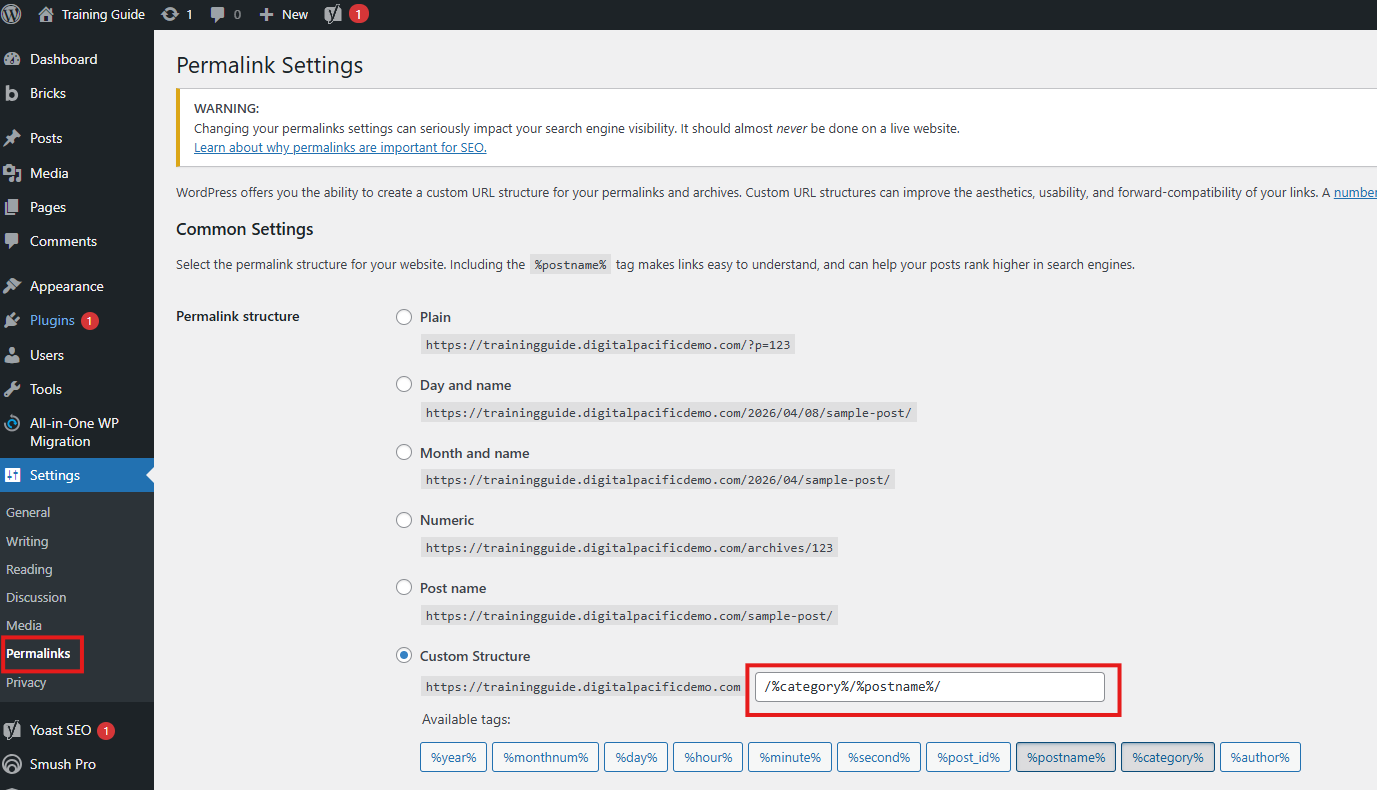
Permalinks
Double check if structure is the same with image below. If no changes, leave it as it. If there is, click "Save Changes".
Yoast SEO
Click "Yoast SEO" on dashboard.
-
General
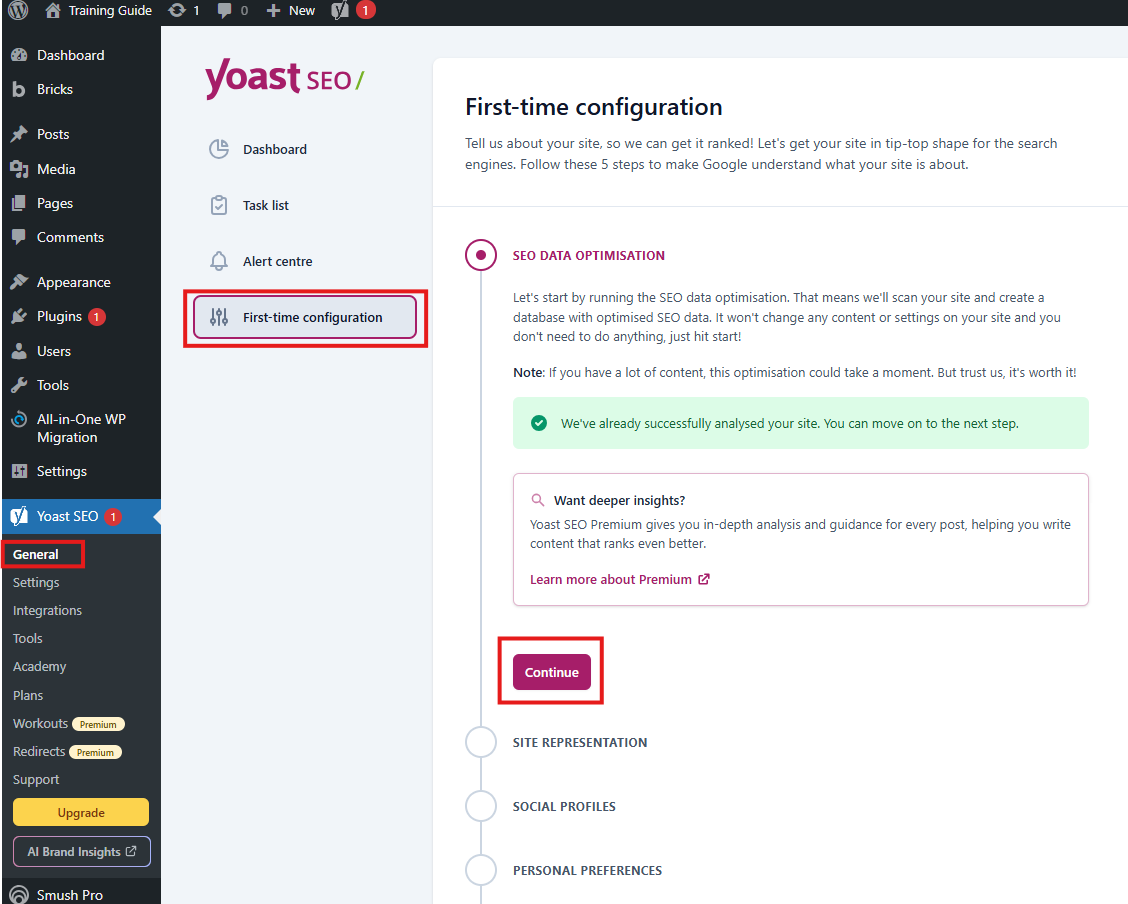
Click First-time configuration, there's no need for inputs/changes in this section. Just keep on clicking Continue or Save and Continue button to finish configuration.
-
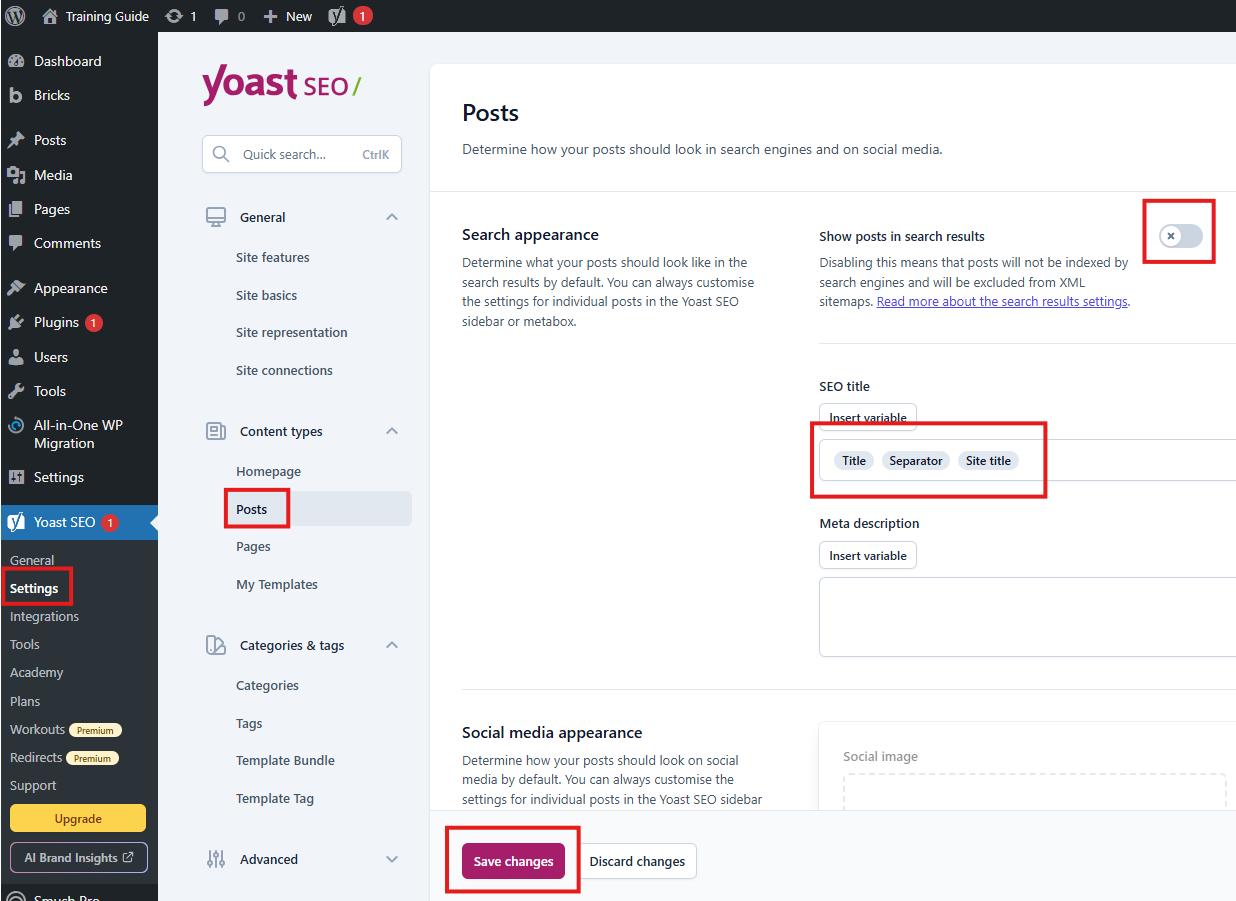
Settings
Click Settings, under Content Types, if there's no post/blog, click Posts tab then uncheck Show posts in search results. If blog exist, leave it as it is. For default SEO Title, just keep Title, Separator and Site Title. Click Save changes once done.
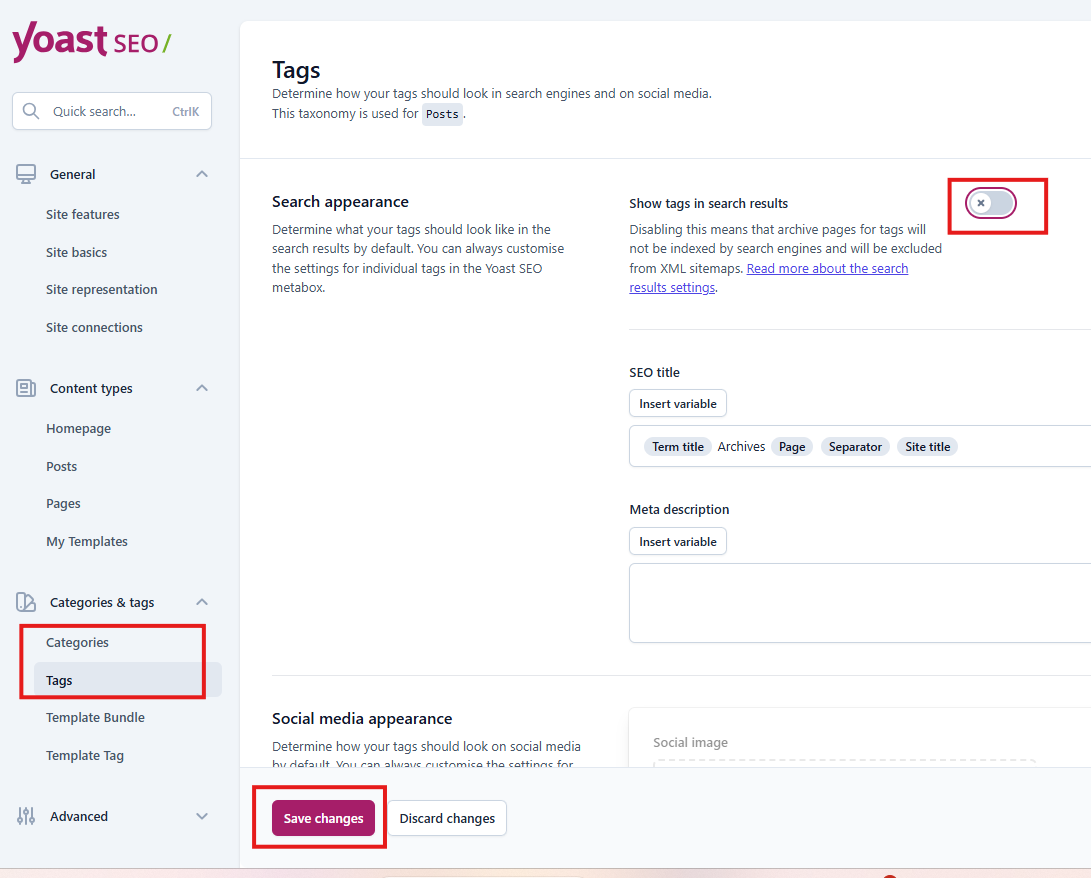
Do the same with all categories, tags and types. Uncheck the button for Search Appearance, then save changes.
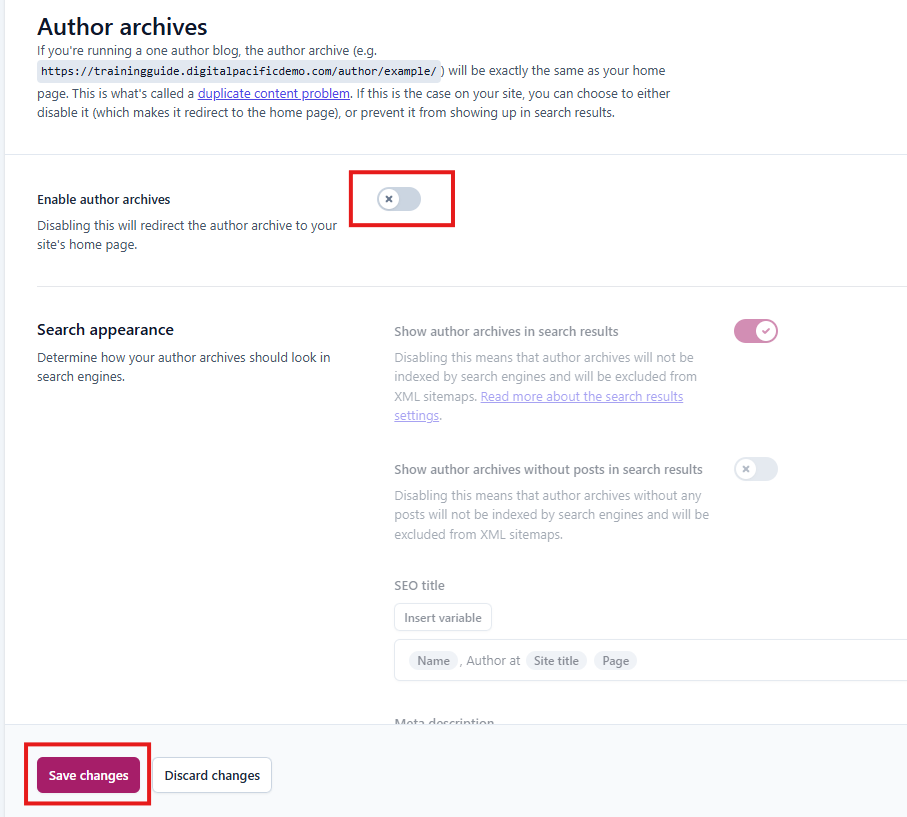
Under Advanced, do the same with authors archives.
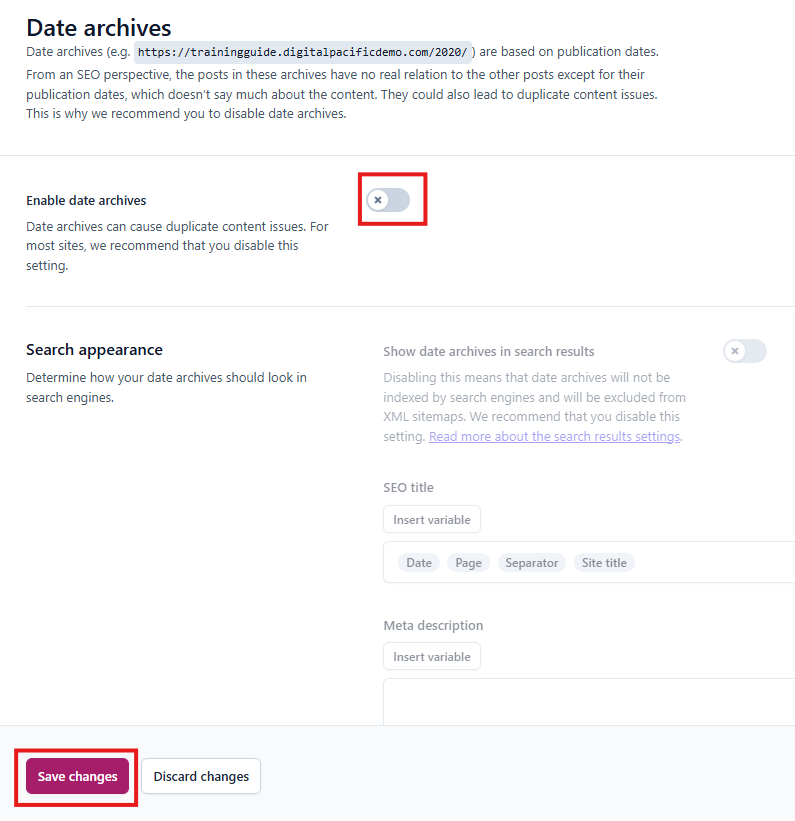
For Date Archives and Format Archives, uncheck/disable archives.
-
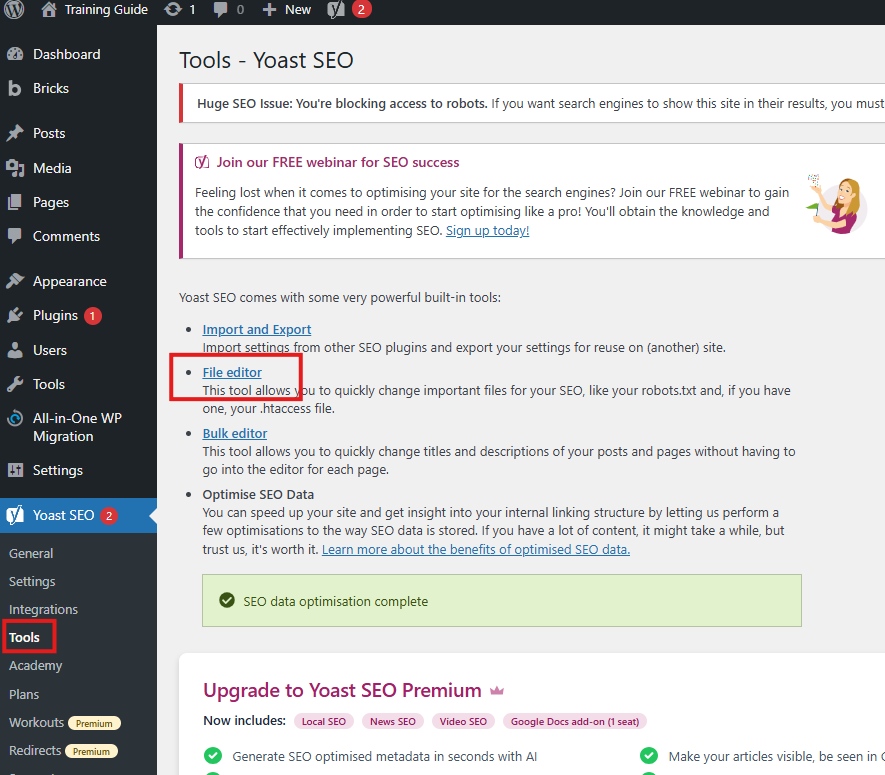
Tools
Click Tools, then File Editor.
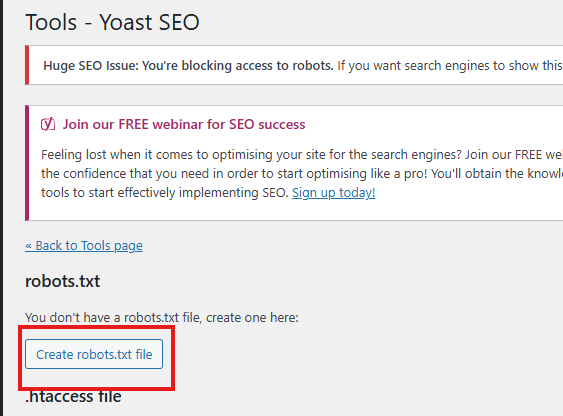
Click Create robots.txt file Button.
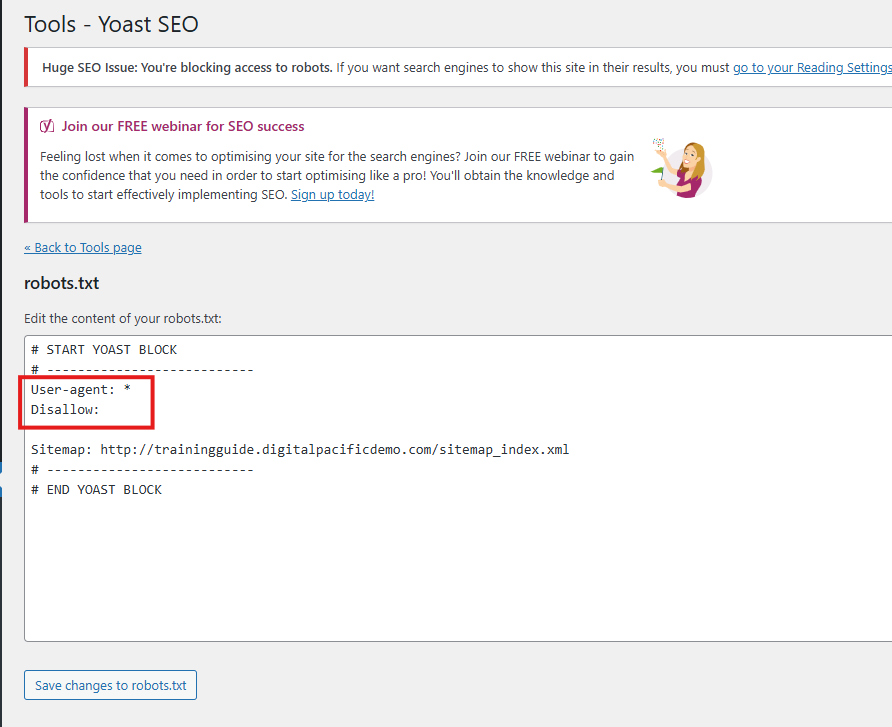
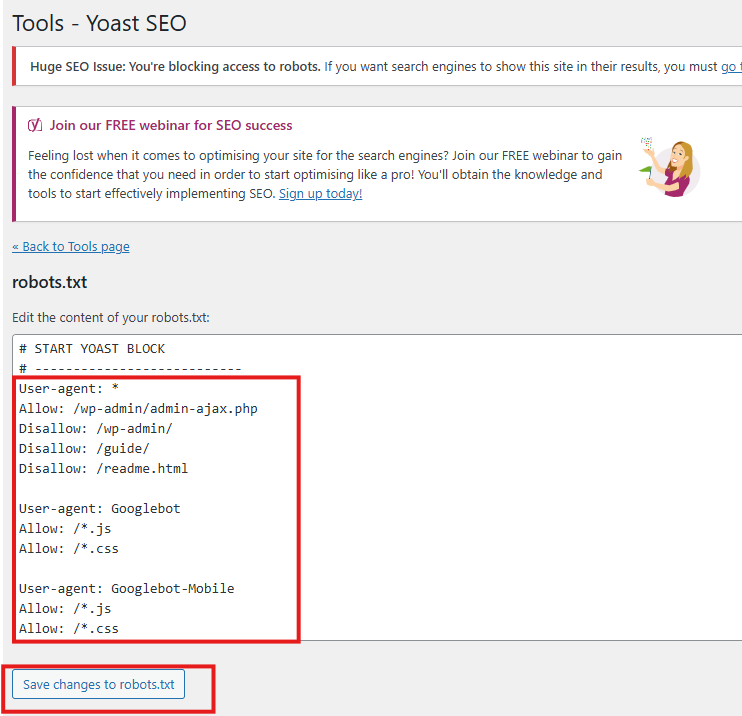
Add this code in robots.txt section, then click Save changes to robots.txt file button to save. Refer to photo below. User-agent: * Allow: /wp-admin/admin-ajax.php Disallow: /wp-admin/ Disallow: /guide/ Disallow: /readme.html User-agent: Googlebot Allow: /*.js Allow: /*.css User-agent: Googlebot-Mobile Allow: /*.js Allow: /*.css
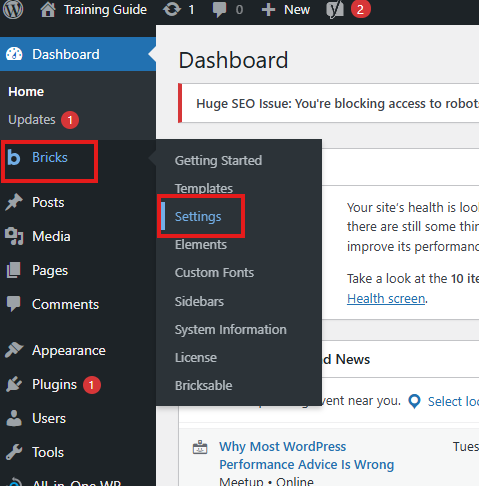
Bricks
Hover over Bricks tab. Then click Settings.
Enable SVG Uploads, for Administrator user to allow uploading of svg files.

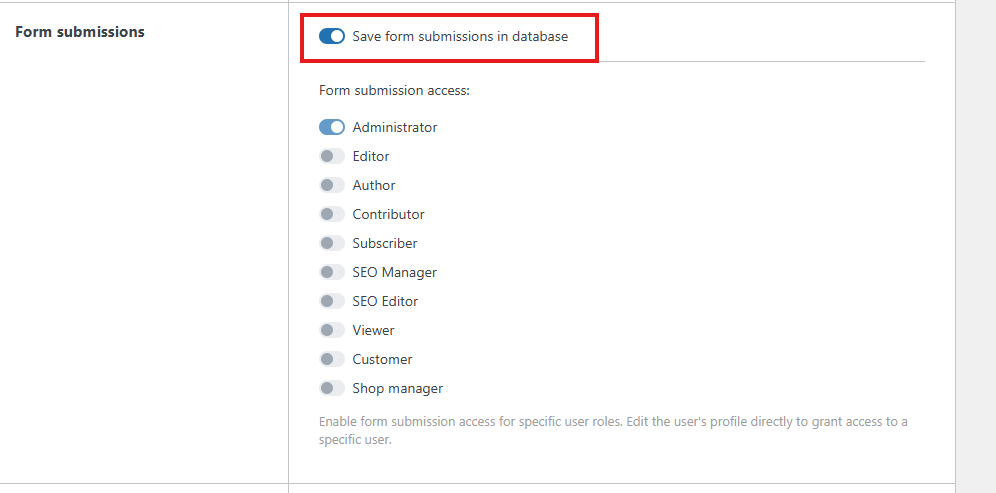
Enable Form Submissions, to Save form submissions in database.
Enable Custom Breakpoints, then click Regenerate CSS files to prepare the website for responsive.

Enable Password protection, then clickSave Changes once done
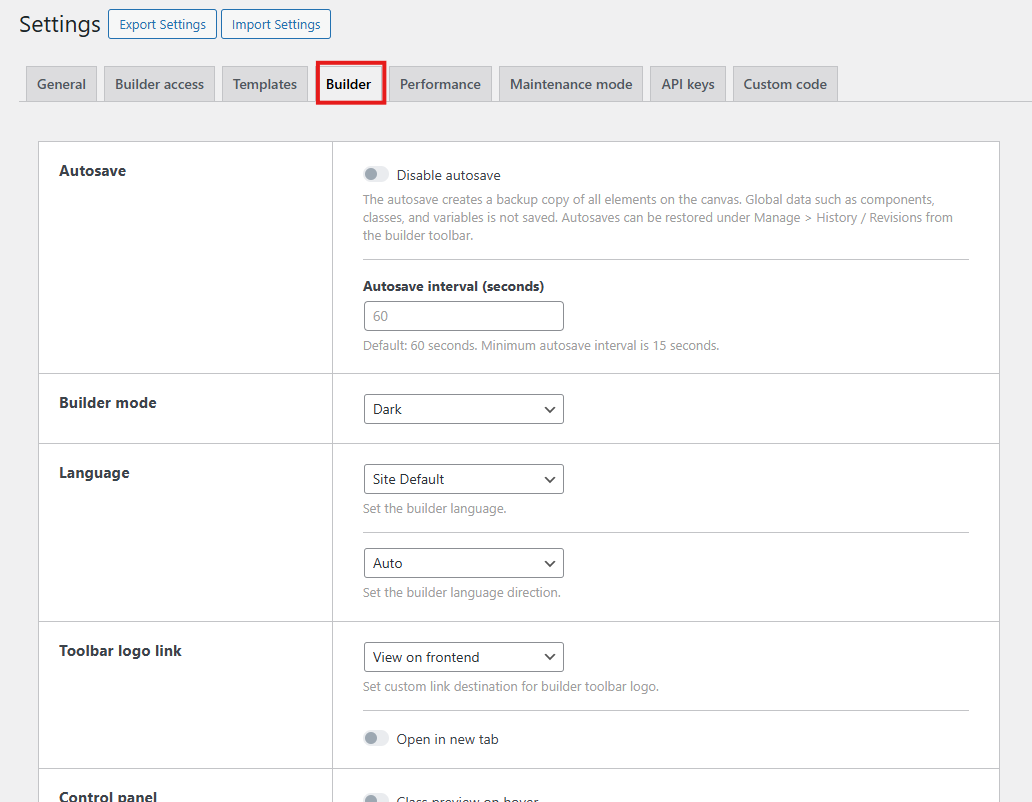
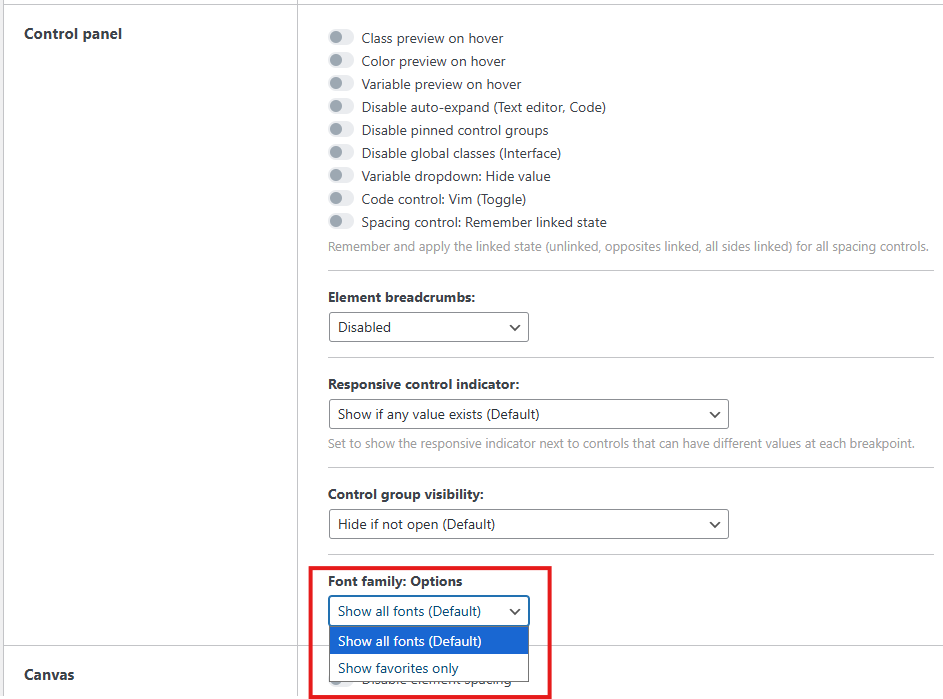
Under Builder tab, scroll down to Control panel section, then set Font family: Options. Choose Show favorites only, if client requested a specific font not available in the builder, upload font file under Font Manage then set it to favorite. If none, keep default setting.
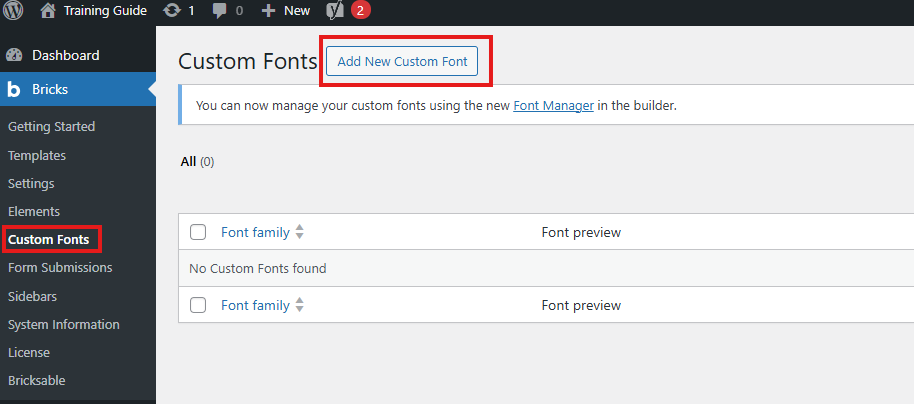
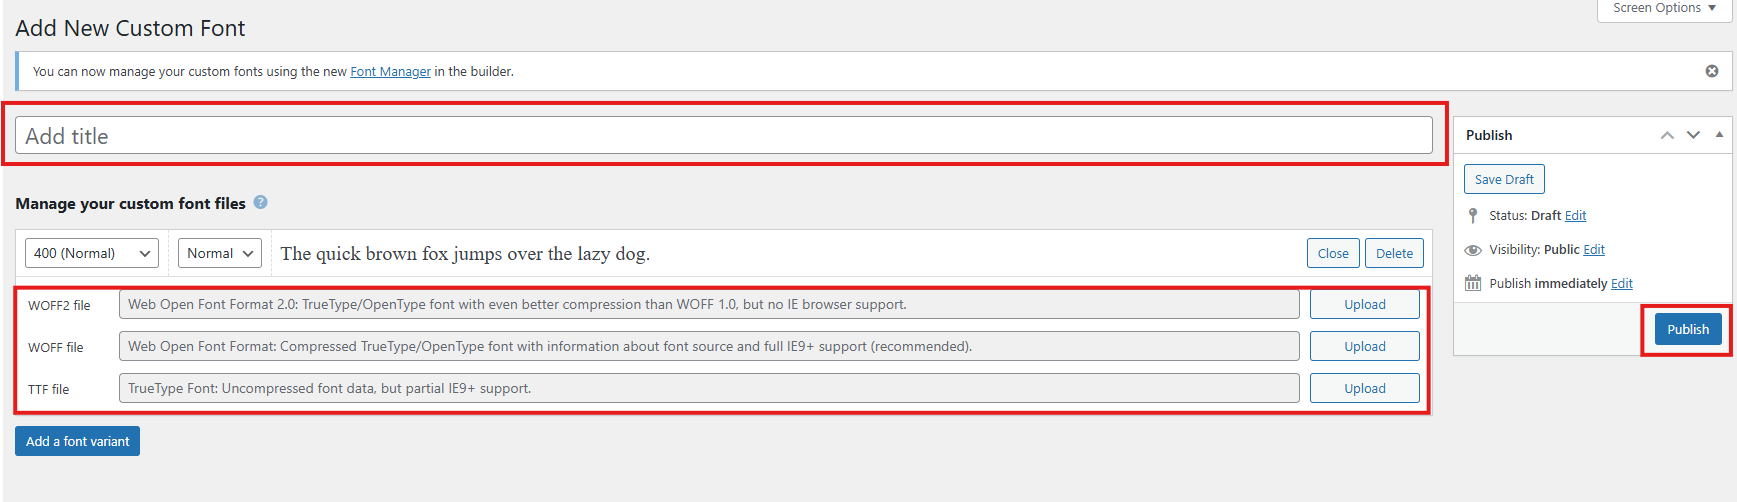
To upload a font, hover over Bricks then click Custom Fonts. Add the Font Title this will show as the font-family, upload Font Files. You may add another variant of the same font but in different font-weight and font-style, then click Publish.
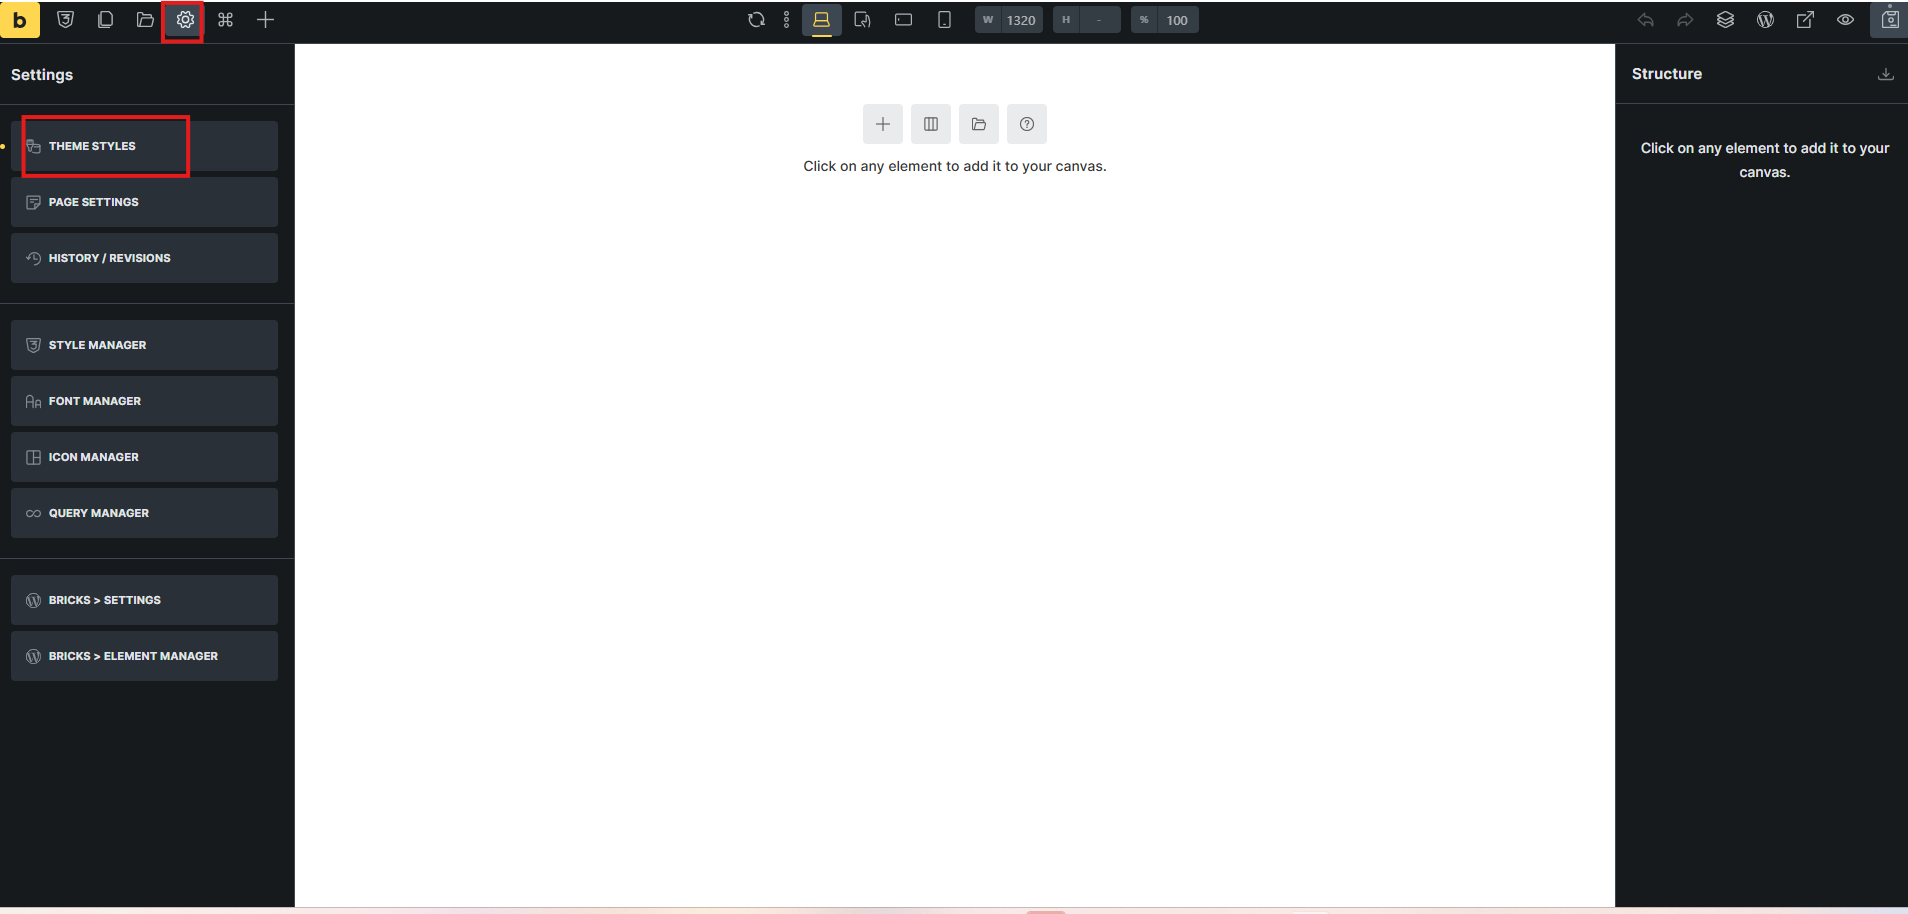
Open a page(any) to enter Bricks Editor. Click Manage(gear Icon) then click Theme Styles.
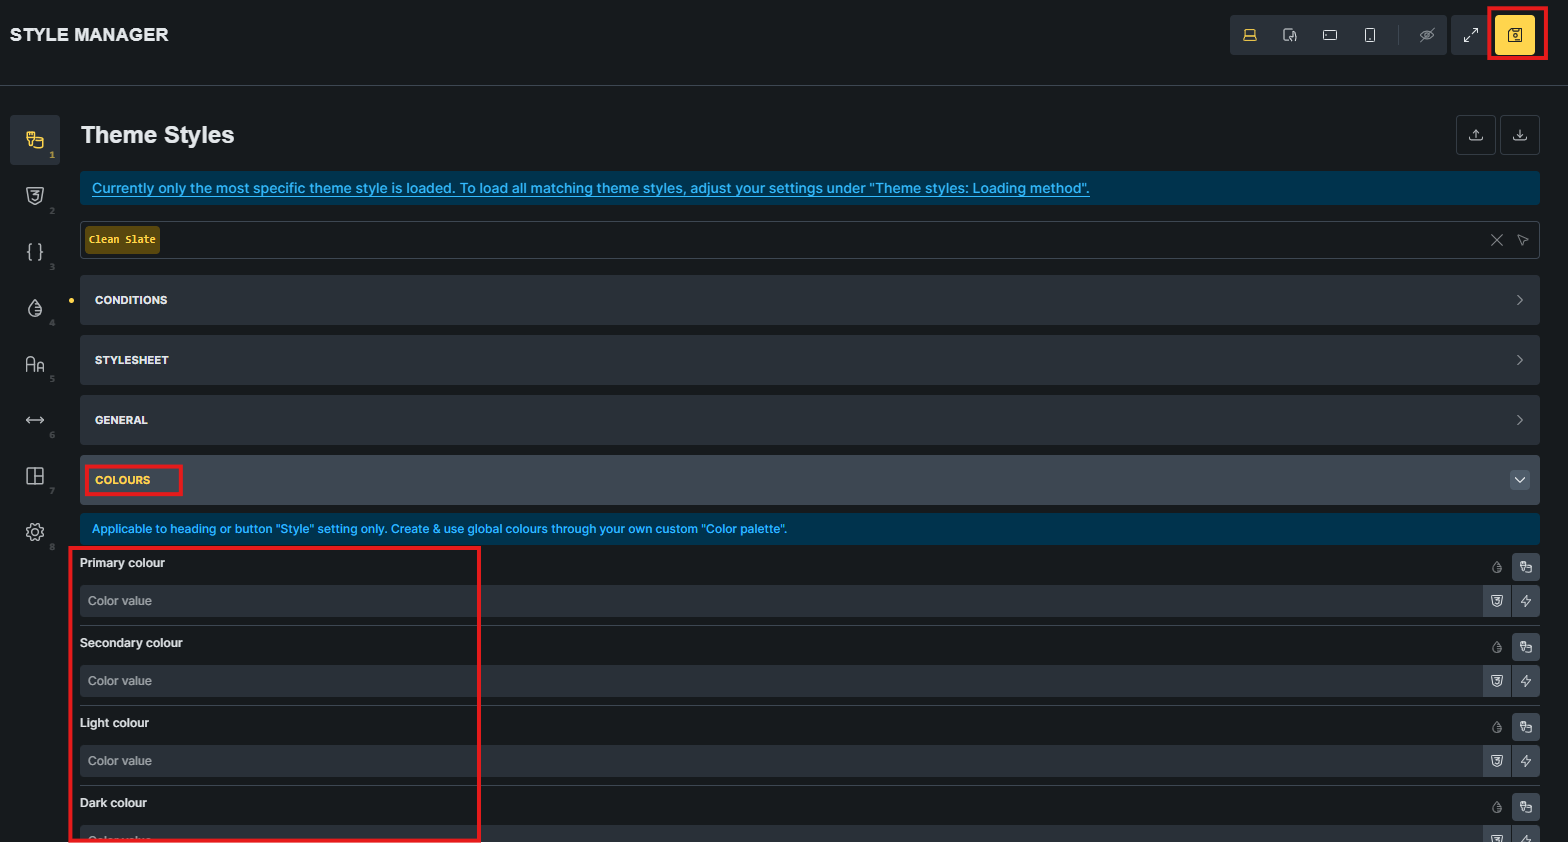
In the Theme Manager, open Colours tab and set the theme color of the website. You can utilize all settings if needed.
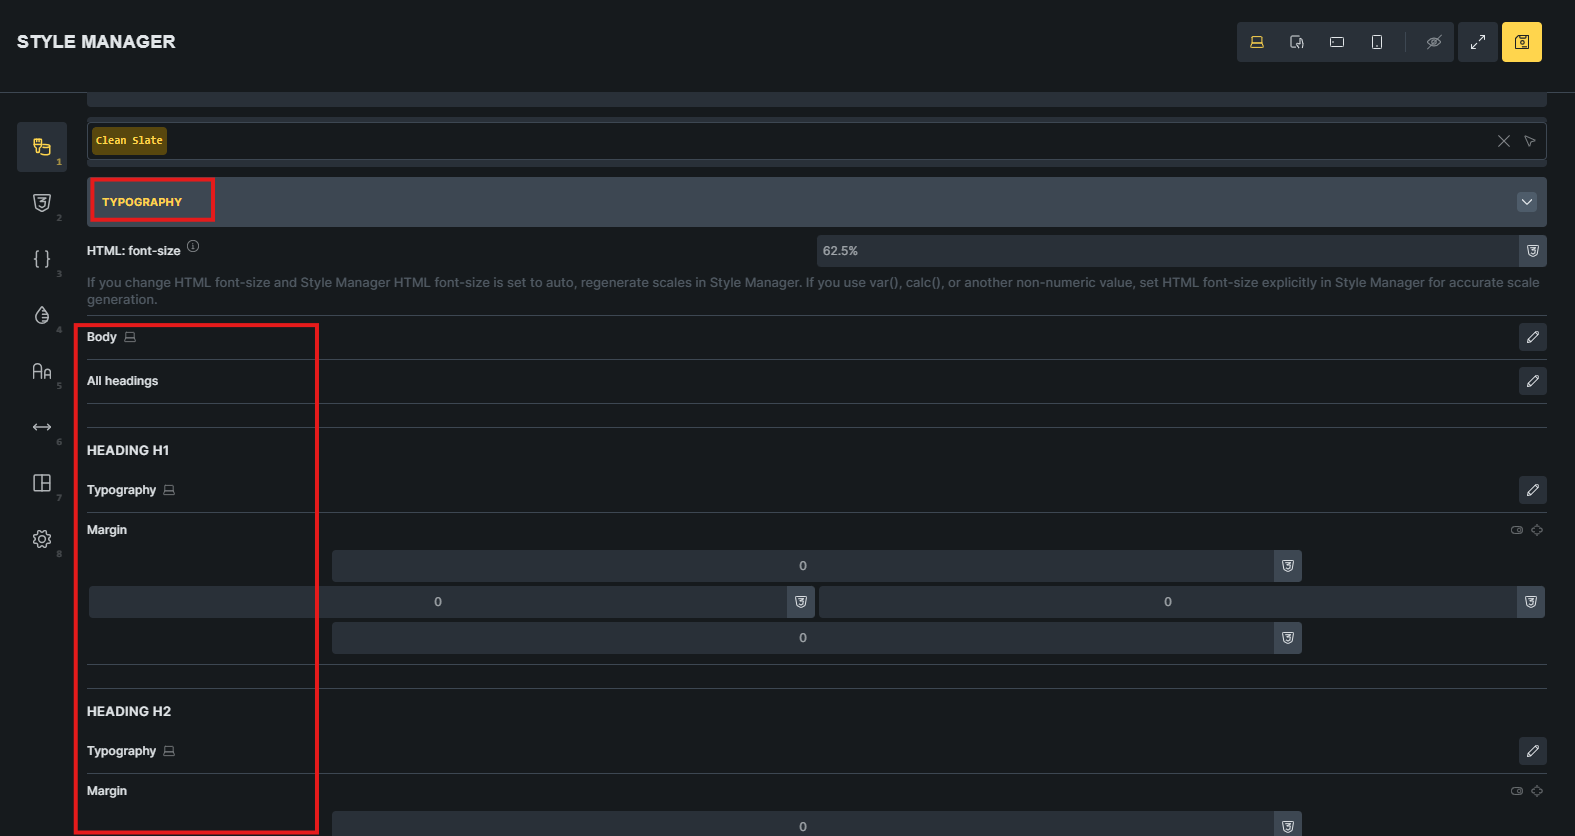
Under Typography tab, set headings and body font-size, font-style and etc. Once done, save changes.
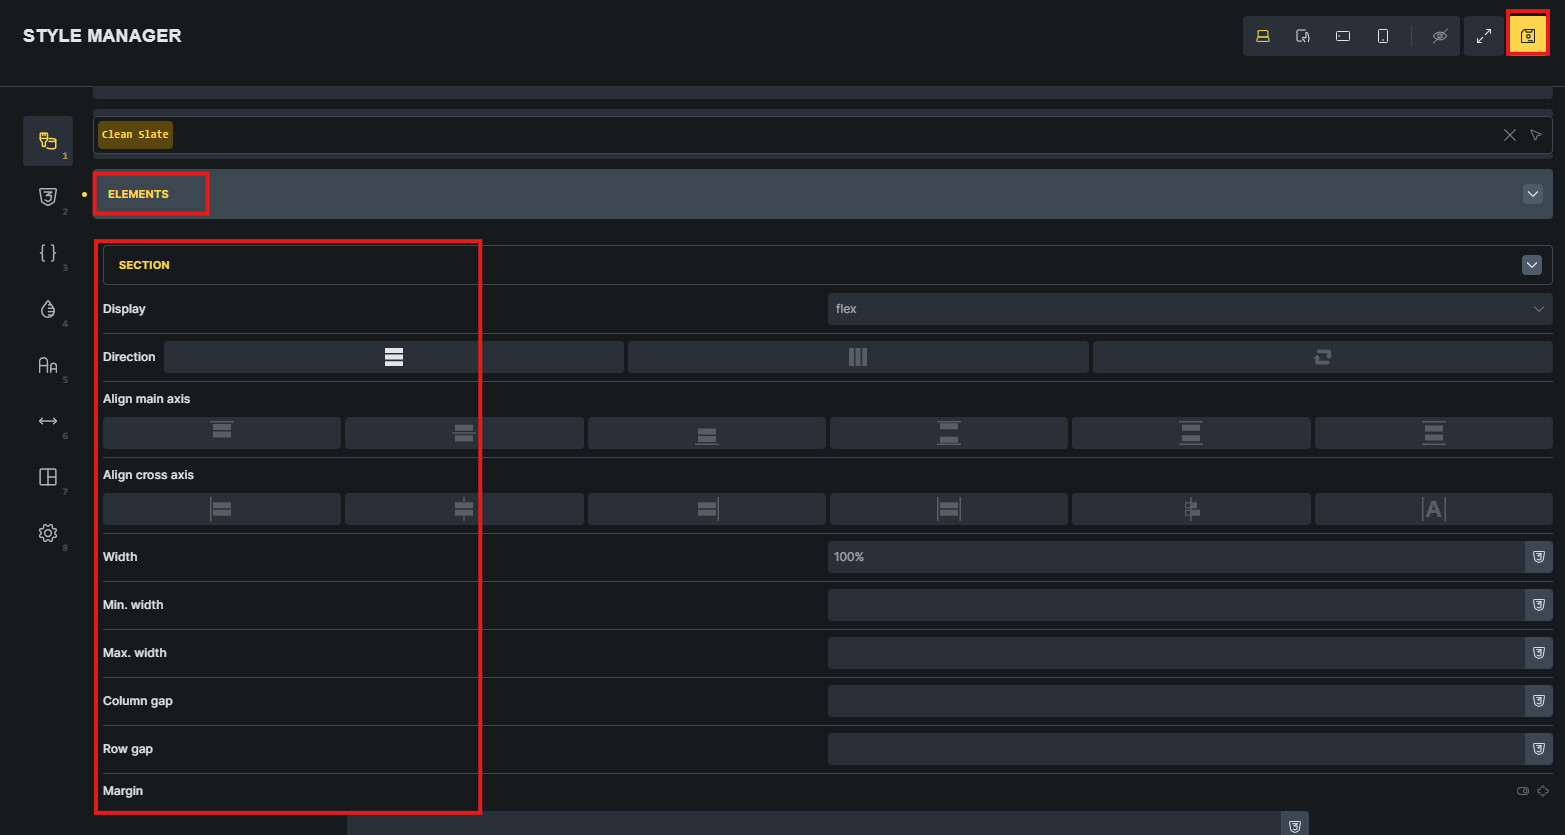
Under Elements tab, apply all desired global settings for each element for layout consistency and uniformity. Save and exit theme manager once done.
Website Development Best Practices
This guide provides development tips and recommendations for an optimized website.
Images
Always compress, minify and resize images to save storage space and optimize website.
Use proper file naming to automatically use it as the title and alt text. Ask the code for functions.php filter from your leader.
Global Setting
Always set and use global setting to help avoid redundant styling.
Always save reusable components, blocks and etc for future use.
Always apply proper heading structure.